How to Use Downloaded Legacy Snippets
If you are not using our install via Shopify's App Theme extensions, follow this guide to download and utilize your legacy snippets in your theme files
Overview:
If you are not using our install via Shopify's App Theme extensions, follow this guide to download and utilize your legacy snippets in your theme files.
Some situations may require you to manually install your existing scripts on your theme before upgrading to our unified Shopify source that will use App Theme Embeds.
Previously, you could simply click a button and we could reinstall your data layer and data listener. However, with Shopify retiring the API we used, you will need to manually install these files or upgrade to our latest versiOur latest version uses App Theme Embeds and you will stay automatically updated in the future!
Download your legacy snippets
Start Upgrade:
- Begin on your Elevar homepage.
- Using the left hand menu manager, click on the "My Tracking" tab.
- Locate your Shopify Source and click on the button labeled "Go to Upgrade".
- (See Figure 1)

Figure 1
Downloading Legacy Snippets:
- After clicking on the "Go to Upgrade" button, you will be brought to a New Shopify Source page.
- Ensure that you are on the "Overview" tab of the Shopify Steps and click on the "Download Legacy Snippets" in the lower right-hand corner of the page.
- (See Figure 2)
- An additional pop-up window will appear titled "Download Legacy Snippets". From this window, click on the "Download" button.
- Ensure that you are on the "Overview" tab of the Shopify Steps and click on the "Download Legacy Snippets" in the lower right-hand corner of the page.
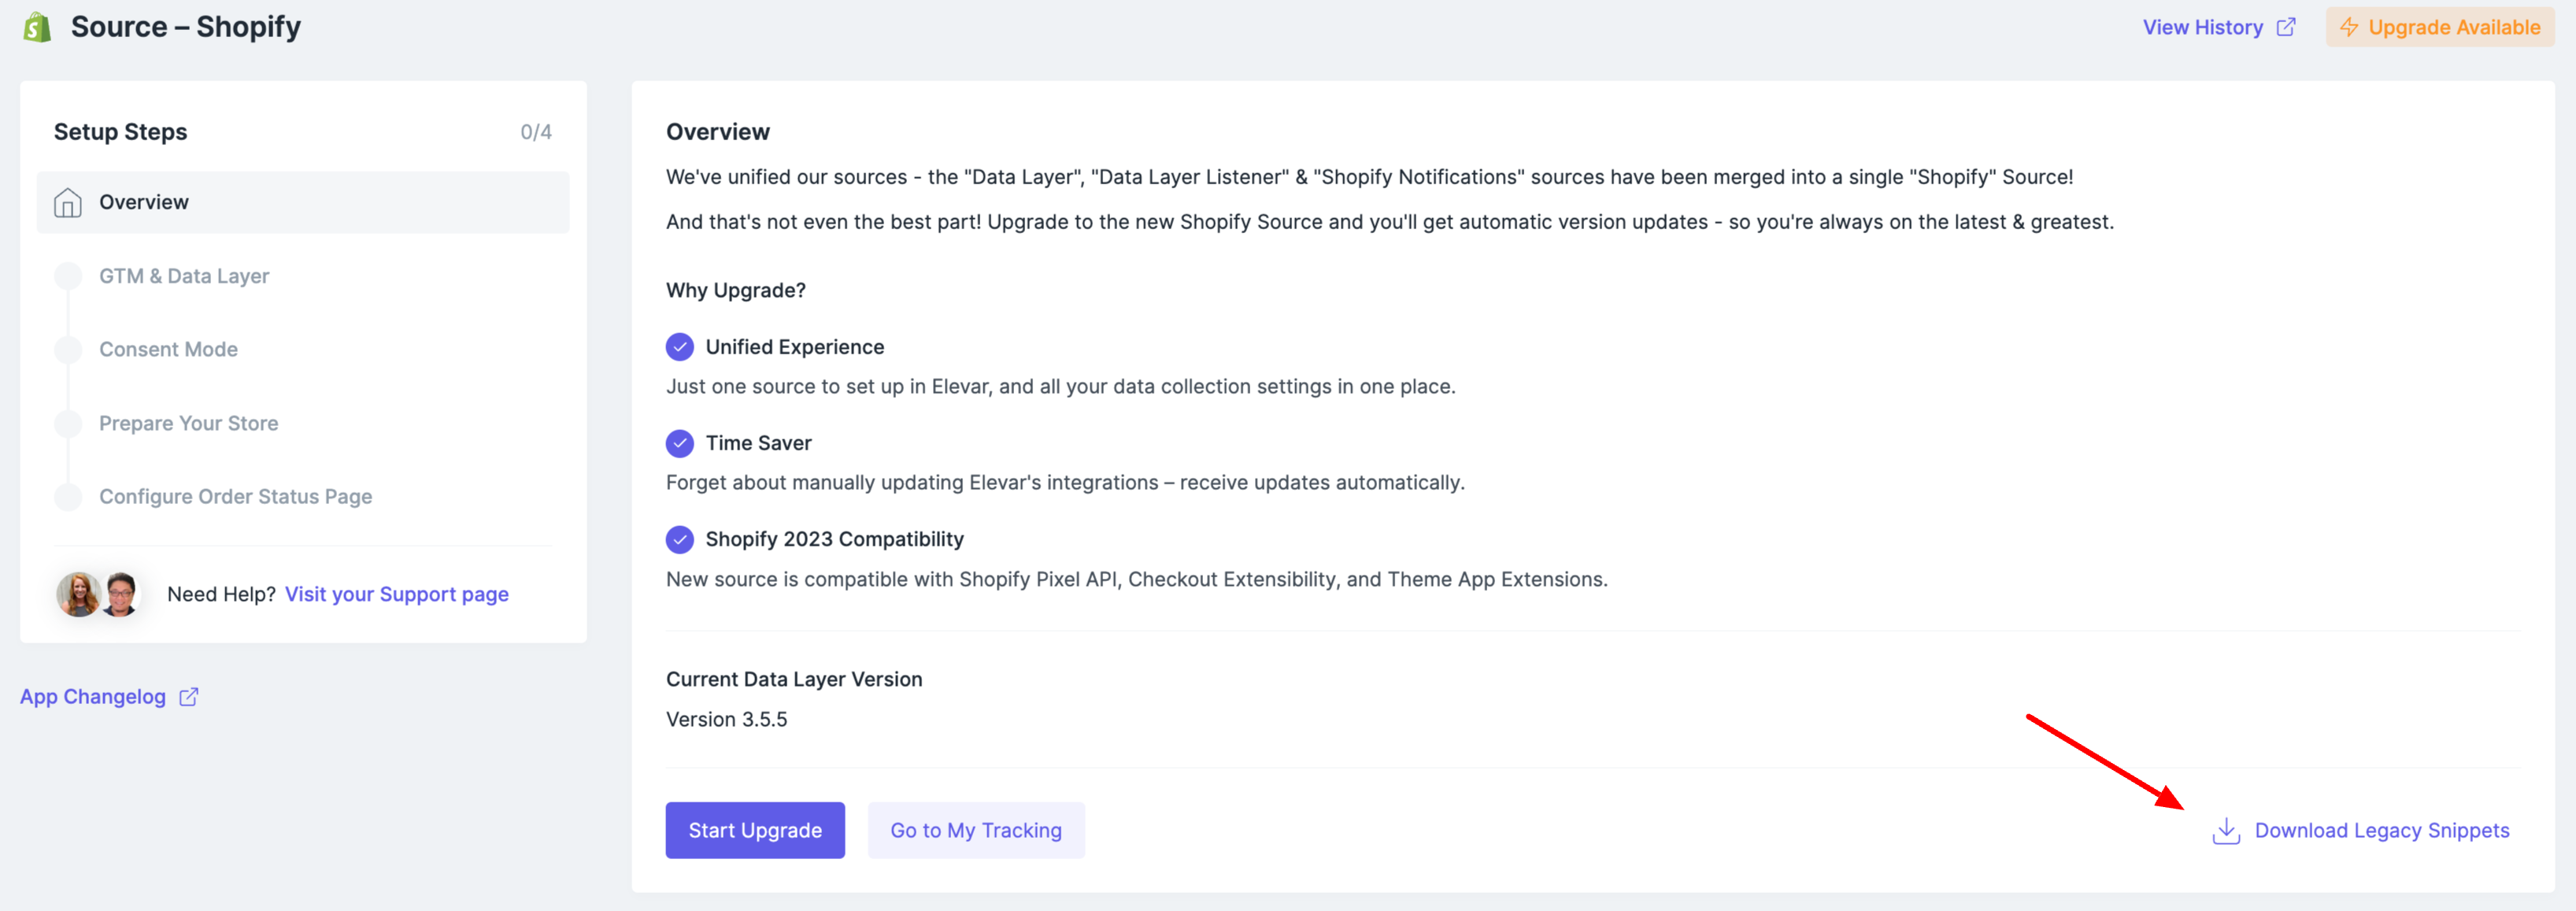 Figure 2
This will download a .zip file containing the files that you will need for your site based on your current settings. These may include:
- elevar-body-end.liquid
- elevar-checkout-additional-scripts.liquid
- elevar-checkout-end.liquid
- elevar-head.liquid
- elevar-head-listener.liquid
- non-shopify-subdomains.html
Add Snippets to your Store
Add New Snippet:
Not all the files downloaded will be added to your theme. You will want to copy the code from these files and add ad snippets by the same name in Shopify. (e.g. elevar-body-end.liquid, elevar-checkout-end.liquid, elevar-head.liquid, elevar-head-listener.liquid)
- With in your Shopify theme, use the side menu and click on the tab labeled "Snippets".
- An additional drop down menu will appear, click on the "+ Add new snippet" button.
- (See Figure 3)
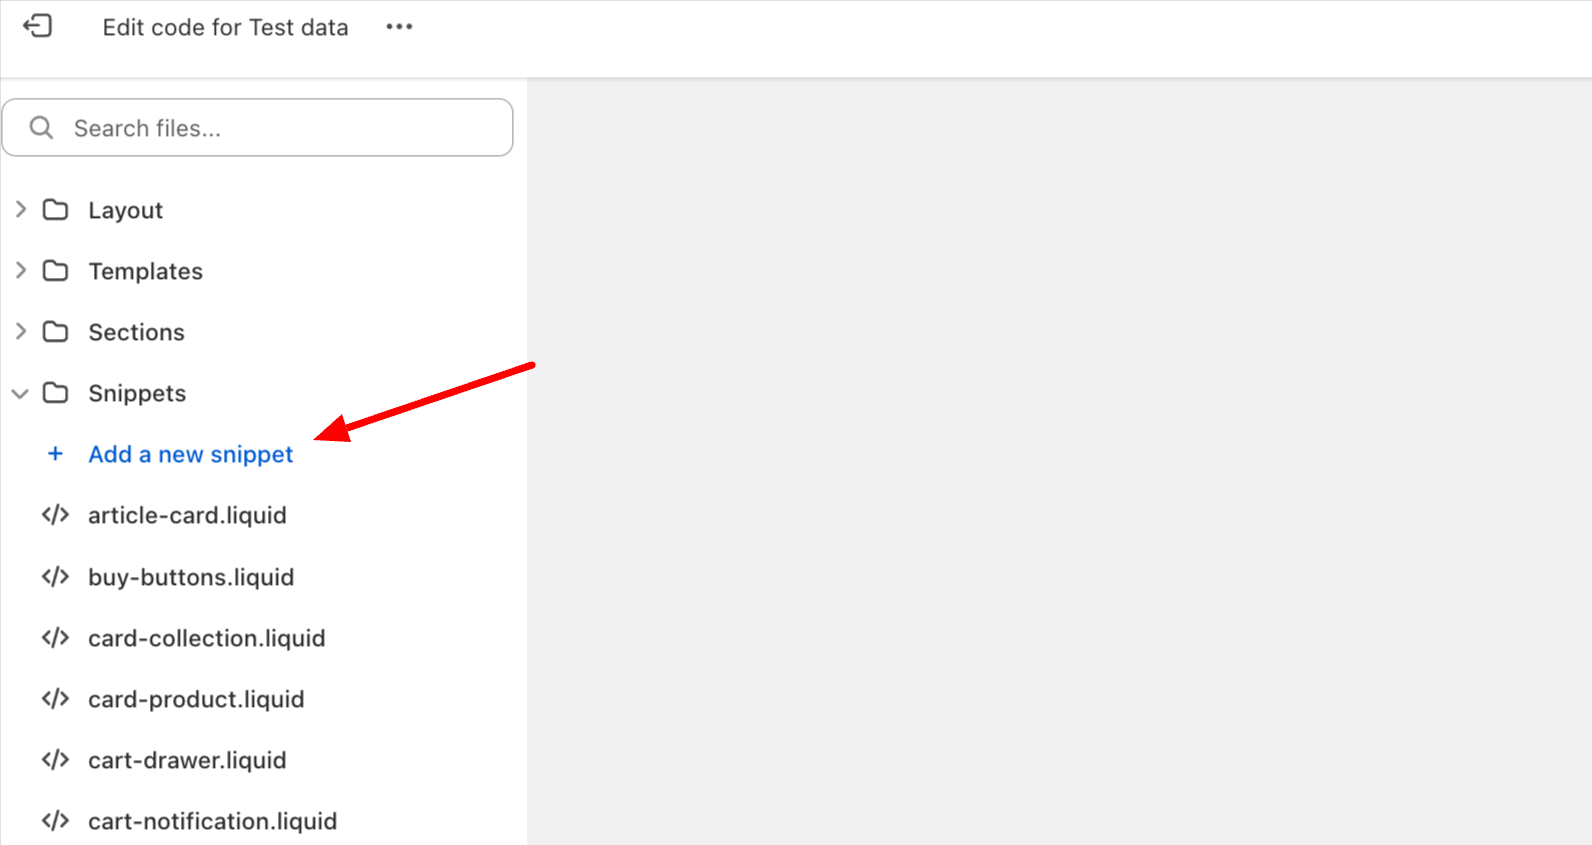
Figure 3
- To add a new snippet, you will need to type in the name of each snippet.
- Name your snippet with the name of file, for example "elevar-body-end".
- After naming the new snippet, be sure to click on the button labeled "Done".
- (See Figure 4)
- Repeat this process for each of the snippets.

Figure 4
- After adding all of the new snippets, click on the "Save" button in the upper right-hand corner of the page.
- (See Figure 5)
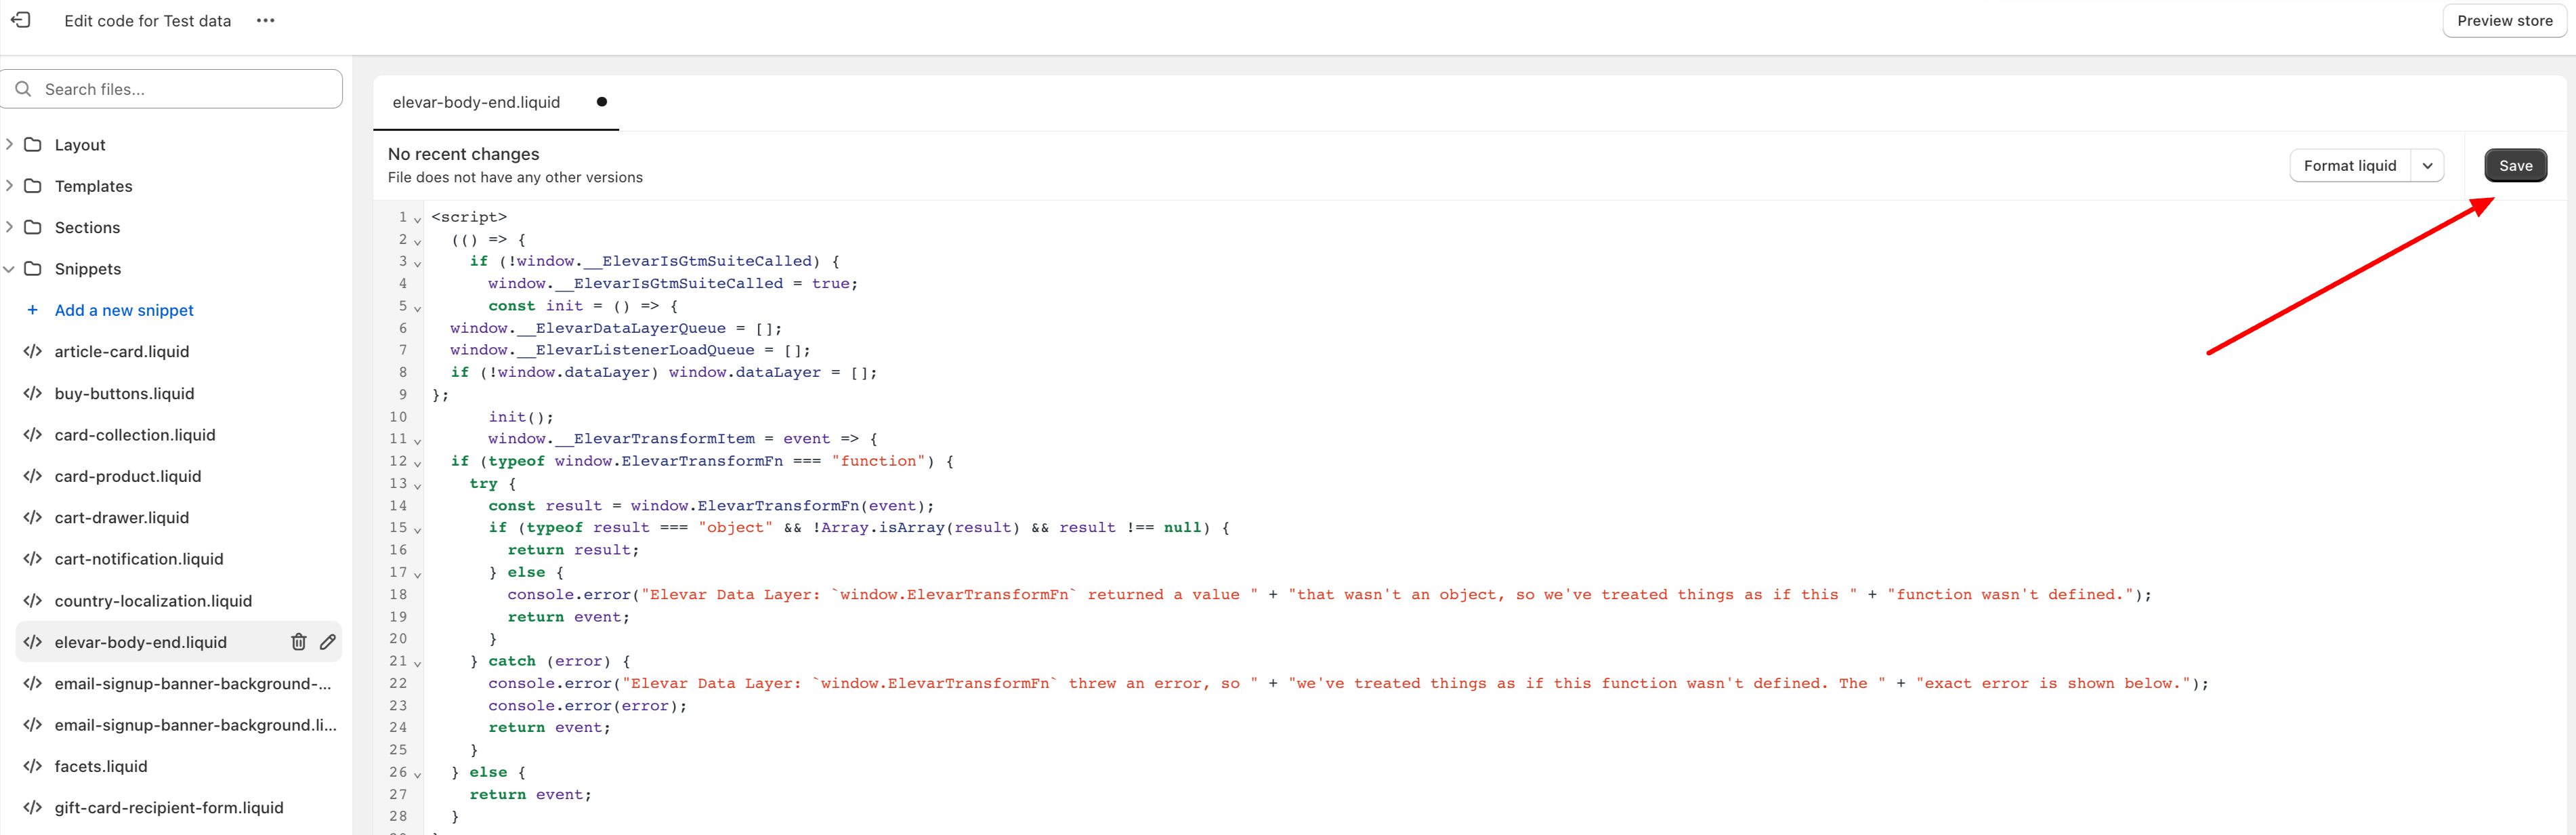 Figure 5
Render Snippets in your Theme
Update the theme.liquid:
- In your theme.liquid file, add the following code directly below the opening tag.
  {% render 'elevar-head-listener' %}
{% render 'elevar-head' %}- See Figure 6 for an example of what your theme.liquid should look like.
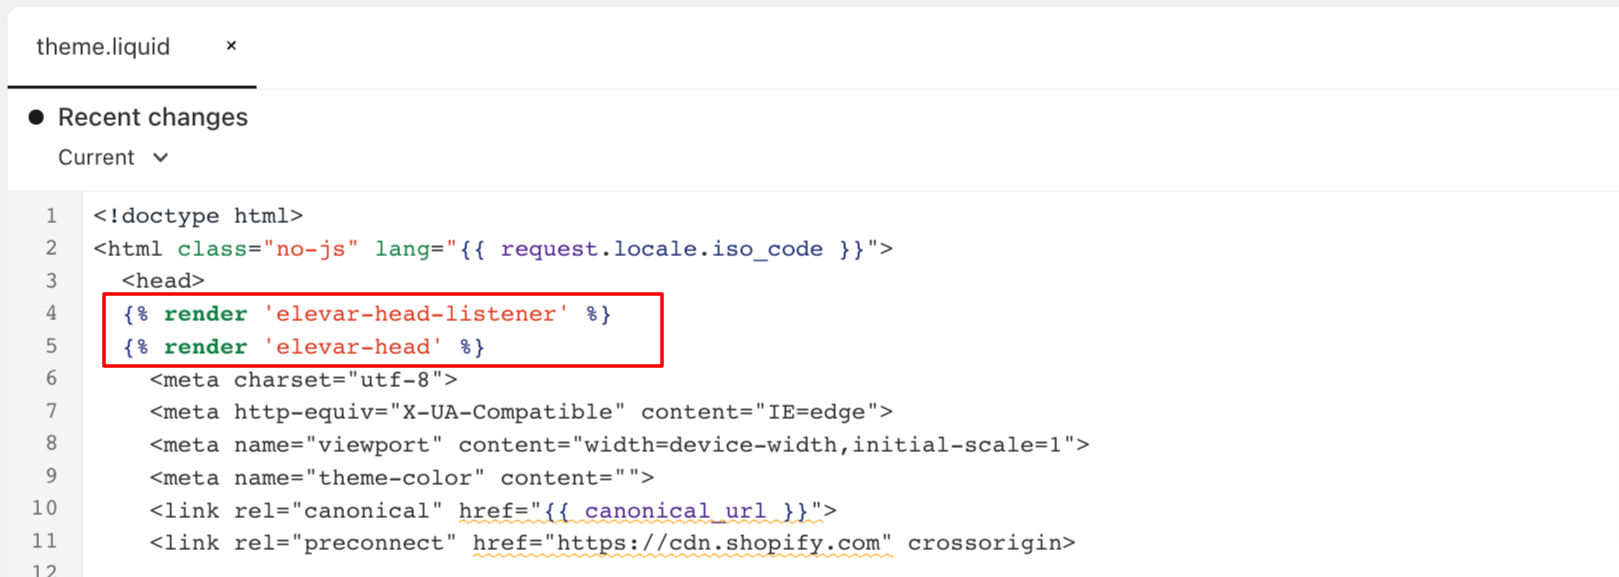 Figure 6
- Next, add the following code to the body directly below your opening tag.
{% render 'elevar-body-end' %}- See Figure 7 for an example of what your theme.liquid should look like.
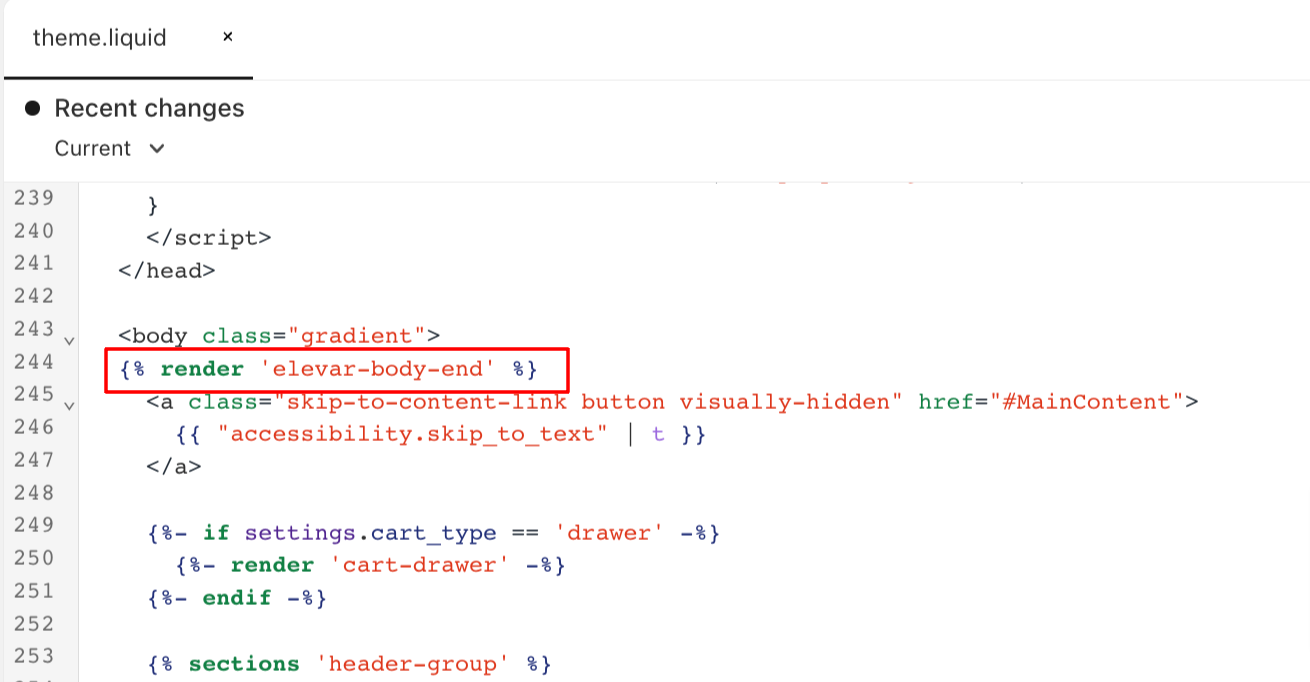
Figure 7
- Once you have made the necessary changes, click on the "Save" button in the upper right-hand corner of the theme.liquid file.
- (See Figure 8)

Figure 8
Update the checkout.liquid
Note: Only update the checkout.liquid if you are a plus store NOT using checkout extensibility!
The checkout.liquid file is only available for Shopify Plus stores. Some Shopify Plus stores may not be using the checkout.liquid or are using checkout extensibility. If you are a non-plus store or using checkout extensibility you can jump ahead to theAdd checkout additional scripts step.
- In your checkout.liquid file, add the following code directly below the opening tag.
  {% render 'elevar-head-listener' %}
{% render 'elevar-head' %}- See Figure 9 for an example of what your checkout.liquid should look like.
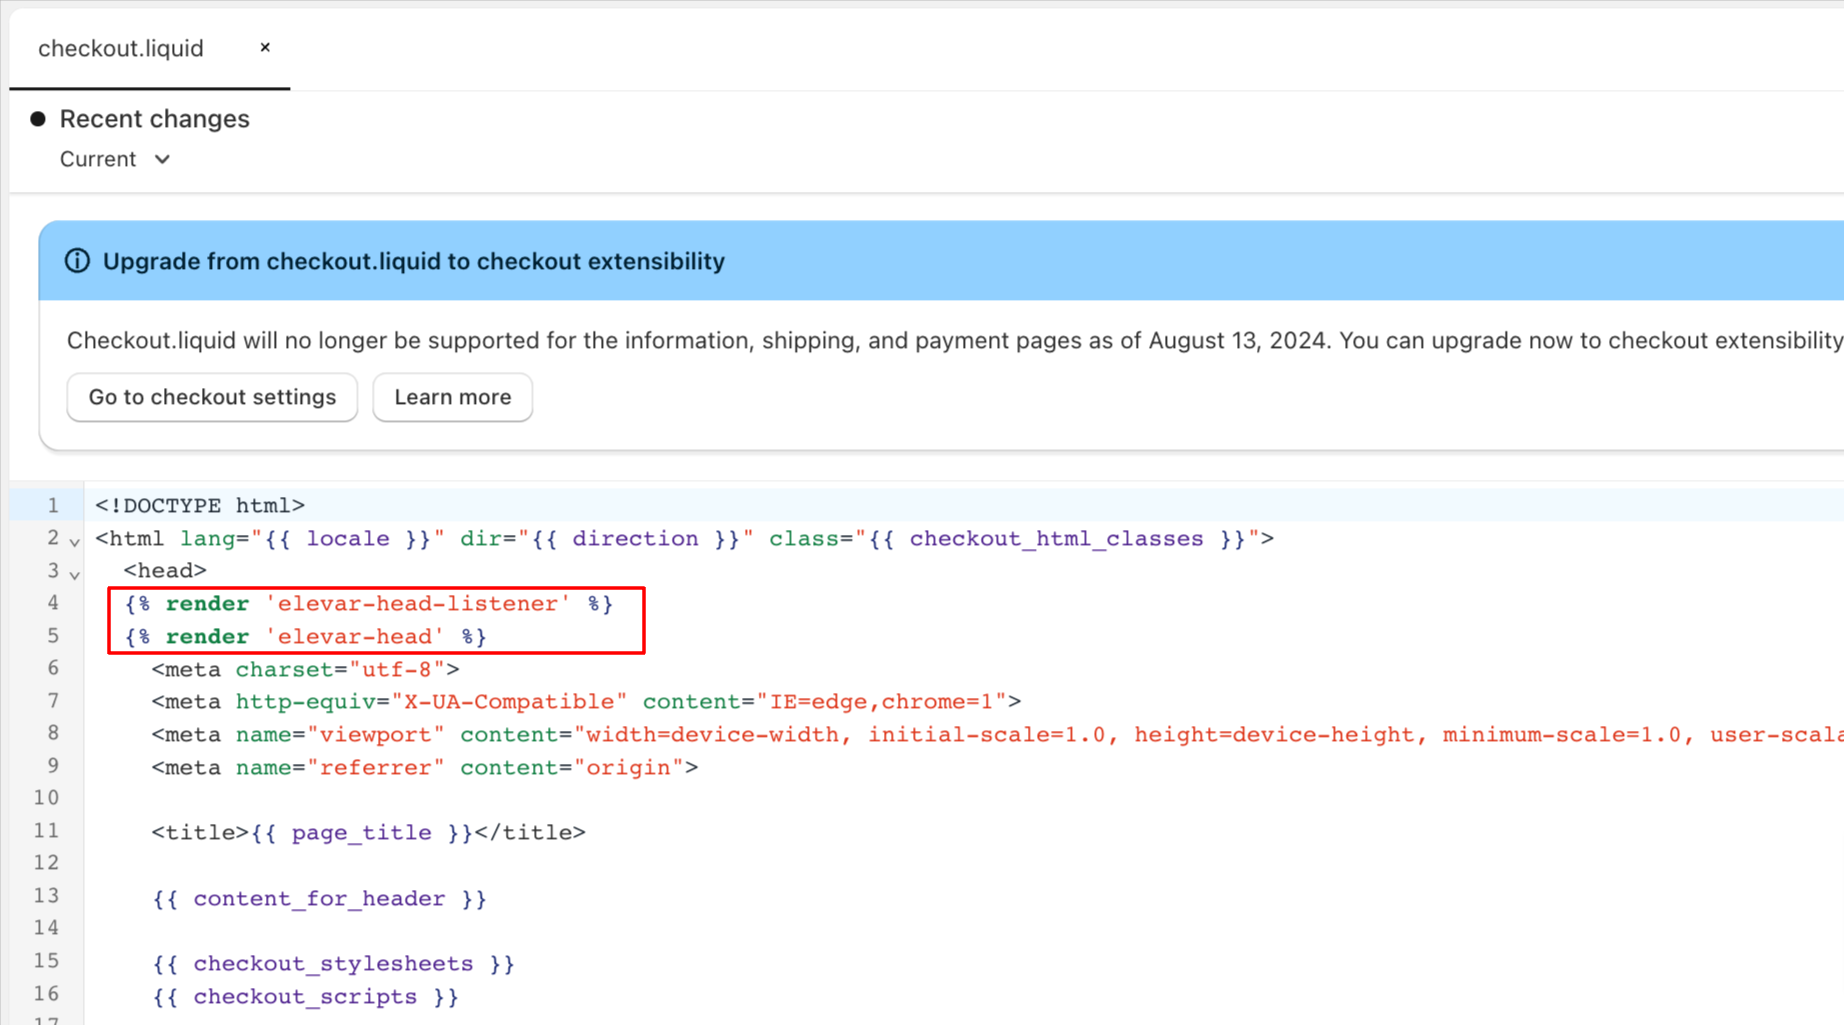
Figure 9
- Next, add the following code to the body directly below your opening tag.
{% render 'elevar-checkout-end' %}- See Figure 10 for an example of what your checkout.liquid should look like.
- Once you have made the necessary changes, click on the "Save" button in the upper right-hand corner of the checkout.liquid file.
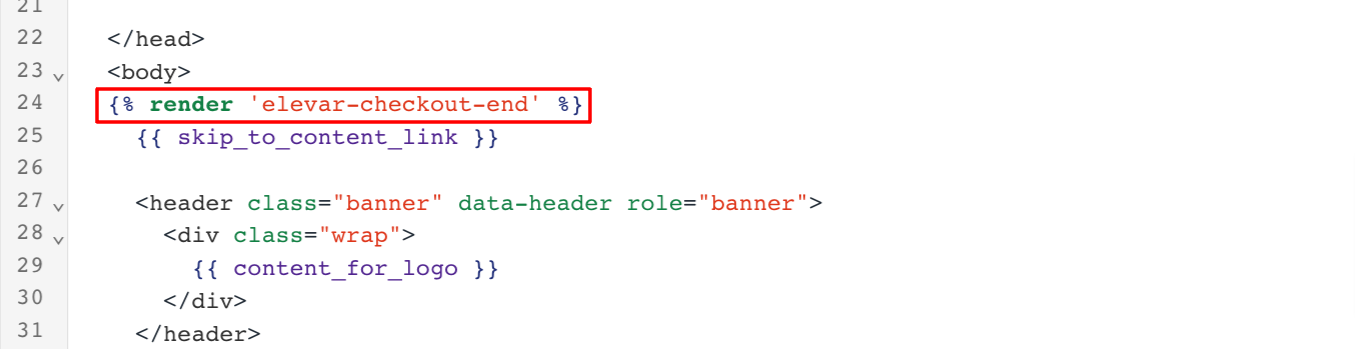
Figure 10
Add Checkout Additional Scripts
Note: Only update these additional scripts if your store is Non-Plus Shopify store, or for Shopify Plus Stores using checkout extensibility!
Navigate to the Checkout Additional Scripts:
- Begin on the homepage of your Shopify store.
- Navigate to the settings by clicking on the "Settings" or the gear icon in the lower left-hand corner of the homepage.
- Using the left-hand menu, locate and click on the "Checkout" tab.
- (See Figure 11)
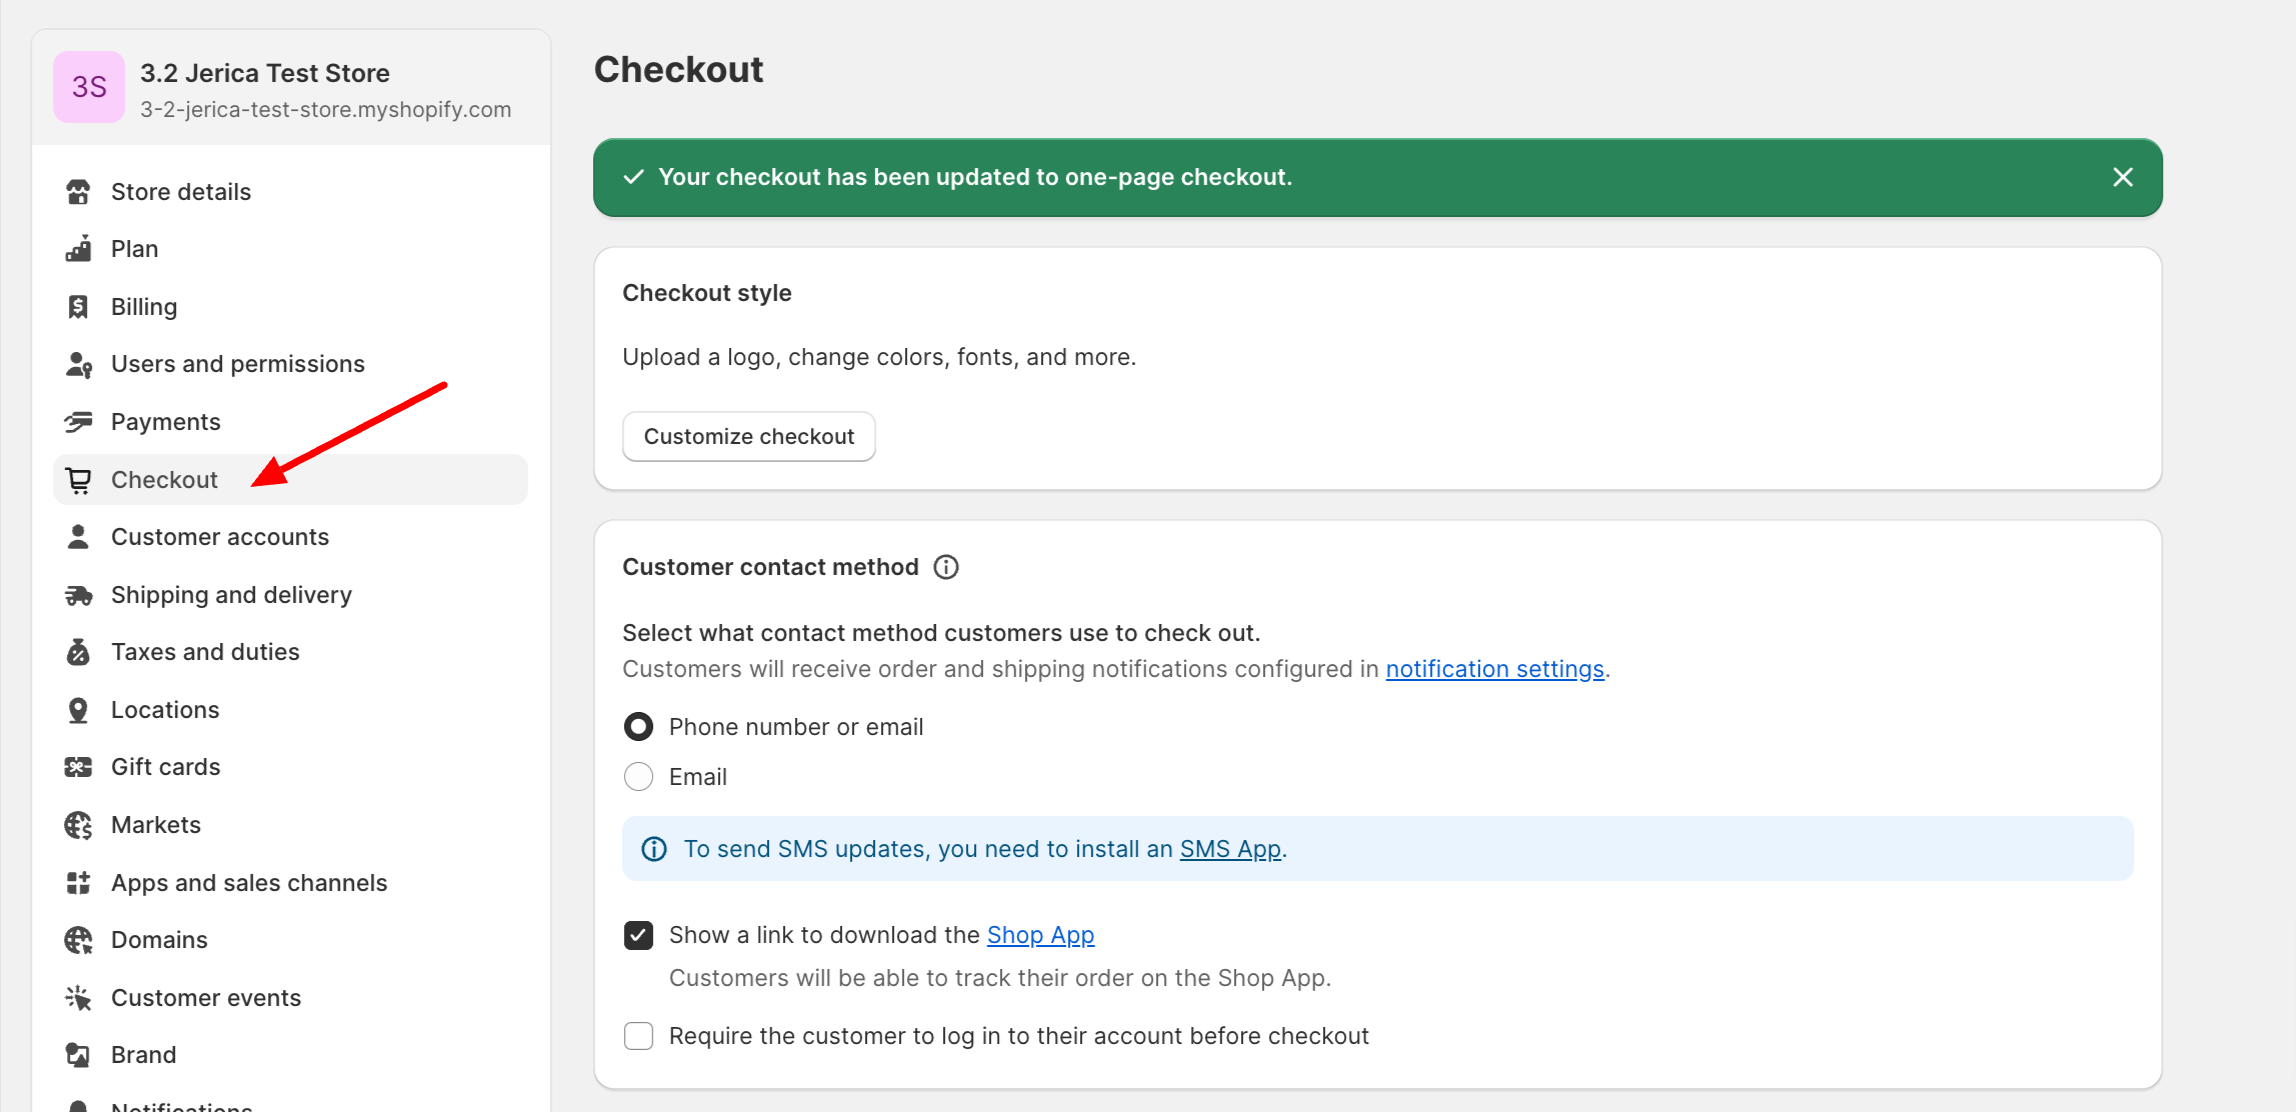
Figure 11
- Navigate through the Checkout settings and locate the additional scripts box in the "Order status page" section.
- Next, you'll want to add the scripts from both files:
- elevar-checkout-additional-scripts.html
- elevar-head-listener.liquid
- Review your existing scripts within the Additional scripts box to see if Elevar's scripts are in place. If they are in place, then you are good to move on. If you do not see Elevar's scripts, copy and paste the code from your two files into the Additional scripts box.
- (See Figure 12)
- Once you have made the necessary changes, click on the "Save" button in the upper right-hand corner of the Checkout settings.
- Next, you'll want to add the scripts from both files:
 Figure 12
Add Non-Shopify Sub Domain Script
If you downloaded files, include a file named "non-shopify-subdomains.html". You will need to add this file to your Non-Shopify subdomain pages.
- Copy the code from the "non-shopify-subdomains.html" file.
- Open your subdomain codebase.
- Paste the code from above into the section on every non-shopify subdomain page that you want to track (e.g. the header of your wordpress blog or a non-shopify landing page).
- Be sure to save your changes!
If you do not have this file you are done!
You're Done!
Your Elevar tracking is now back in place. We recommend upgrading to the new Shopify Source when you are ready. Follow this guide for upgrading, [How to Update to the Shopify Source and Theme App Embed]</a.
Updated 3 months ago