How to Import Product Category Data into Google Analytics 4
Follow this guide if you are using our Server-Side Integration, but also want to learn how to import product category aata into Google Analytics 4
Overview
Follow this guide if you are using our Server-Side Integration, but also want to learn how to import product category aata into Google Analytics 4.
The Challenge:
- Order data in Shopify doesn't have Product Category populated, so our GA Server-Side Integration isn't able to send Product Category data.
The Solution:
- You can import your Shopify Product Type data into GA4 to have Product Category populate.
Create a Spreadsheet of Product Type and SKU Data
Create Excel Spreadsheet:
- First, you will need to create an Excel Spreadsheet to import.
- You will need two columns of data: Product Type & SKU.
- We'll start by downloading our pre-built Product Type Data Import Template below and then populate the template with your Shopify SKU & Product Type data.
- Download our pre-built Product Type Data Import Template here as a CSV.
Export Product Data:
- Next, you can easily export your product data from Shopify's Product Admin.
- Log into your Shopify and click on the "Product" tab from the left hand menu.
- Next, click on the "Export" button in the upper right-hand corner of the page to export all of your product information.
- (See Figure 1)

Figure 1
- Shopify will include a lot of data in this export. You can delete all the data except the Product Type and SKU columns.
- (See Figure 2)

Figure 2
Note: Check the Product Type column & ensure you aren't missing any categories for your SKUs!Also, please make sure that you are sending the SKU as the product ID to your GA4 property, in case this is different, please make sure to look for the appropriate IDs in this file.
- Copy your Shopify "SKU" data into the "item_id" column.
- Copy your "Product Type" data into the "item_cat1" column.
- Don't forget to save your changes!
- (See Figure 3)
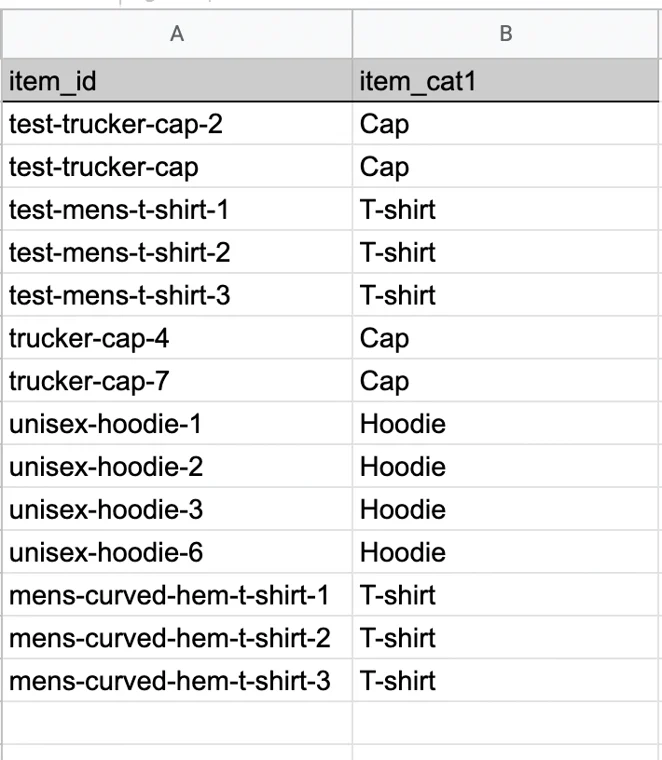
Figure 3
Create Your Data Import in Google Analytics:
Access Property Settings:
- Begin by logging into your Google Analytics 4 Account.
- Click on the "Admin" Settings or the gear icon in the lower left-hand corner of the homepage.
- Use the menu and click on the tab titled "Property Settings".
Create Data Source:
- Once in the Property Settings, click on the tab titled "Data Import".
- Once in your Data Import settings, select the button labeled "Create data source".
- (See Figure 4)
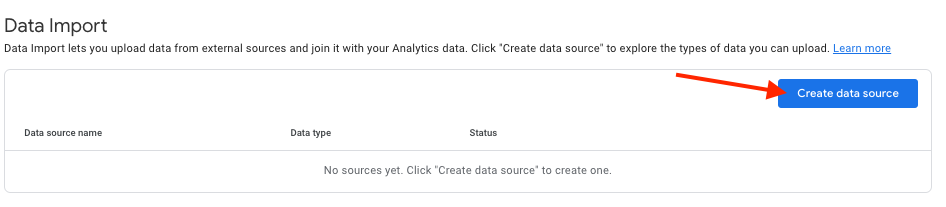
Figure 4
Data Source Details
Create Data Source:
- To create a new data source, include a name under the subheading titled "Data source name". Using the text box, title this data source "Shopify Product Category".
Edit Data Source Details:
- Under the Data Type category, ensure that you have the button labeled "Item data" selected.
- Navigate to the box titled, "Upload data for import" and select the button labeled "Manual CVS upload".
- Finally, select the button labeled "Upload CVS".
- (See Figure 5)
- Finally, select the button labeled "Upload CVS".
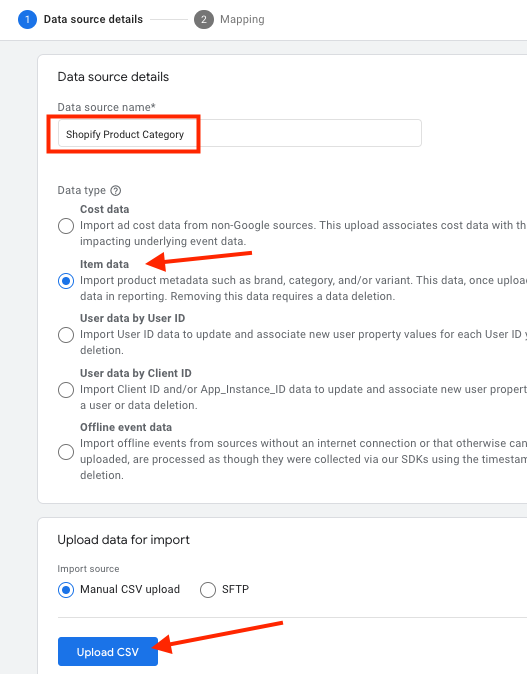
Figure 5
Mapping
Data Source Mapping Details:
- Once in the mapping section, locate the "Id" tab. Using the drop-down menu, select "item_id".
- Repeat this process again with the "Category 1" tab, and select "item_cat1".
- Finally, click on the "Import" button in the supper right-hand corner of the page to save the changes.
- (See Figure 6)
- Finally, click on the "Import" button in the supper right-hand corner of the page to save the changes.
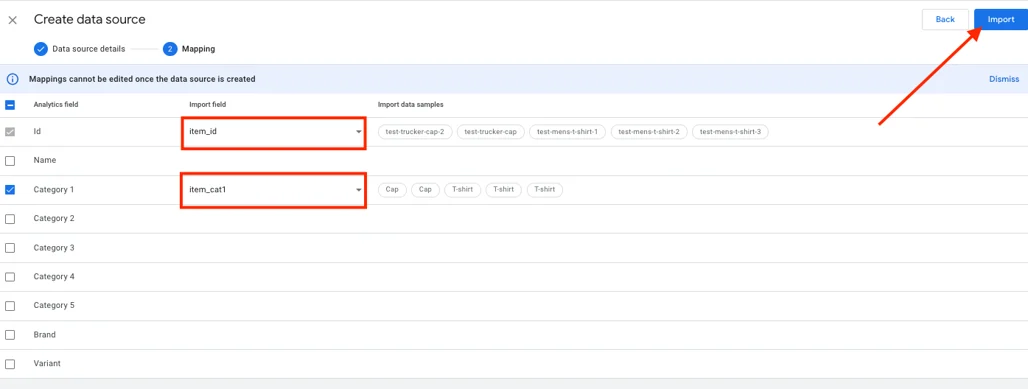 Figure 6
Note: Status message of "Unknown"If the Data Import doesn't work and it shows a Status message of "Unknown" please make sure that you do this from your Chrome browser while being logged into Chrome with the same account that you use for Google Analytics 4!
Frequently Asked Questions:
What type of maintenance is required?
- Minimal maintenance is required! This Data Import will populate the Product Category for the SKUs in your spreadsheet moving forward. If you add a new SKU, you'll need to upload an updated file.
Does this data import apply retroactively?
- Item-data import maps item_ids in historically and ongoing collected events to the item-field values you import, and processes and displays the uploaded values (in audiences, reports, and explorations) instead of the originally collected values.
Updated 7 months ago