How to Set Up Pub/Sub as a Server-Side Destination
Follow the step by step guide to launching your Pub/Sub Server-Side Tracking
Note: The pub/sub connector is likely to be used only by technology partners and clients with a data team that wants raw access to our event stream.This connection is unlike any other because it does not connect the merchant to a channel (like Facebook); rather, it provides a raw export of the event data that Elevar generates. This export is similar to a BigQuery export from GA4 but bypasses GA4.
Overview
Follow this guide to learn how to set up Pub/Sub as a server side destination.
Learn About the Events and Properties Elevar Sends to Pub/SubRead this guide to learn more about the specific events and properties Elevar sends to Pub/Sub.
Prerequisites:
Before completing the steps below, ensure that you have:
- Installed the Shopify Source on your store. Follow this guide to learn how install the Shopify Source.
- Created a GCP project. Follow this guide to learn how to create a Google Cloud Project.
- Elevar service account email address (Available to active Elevar customers).
Create a Google Pub/Sub Topic
Access Pub/Sub:
- Begin on the Google Cloud homepage and use the left-hand menu to located in the upper left-hand corner to click on the "Pub/Sub" tab.
- (See Figure 1)
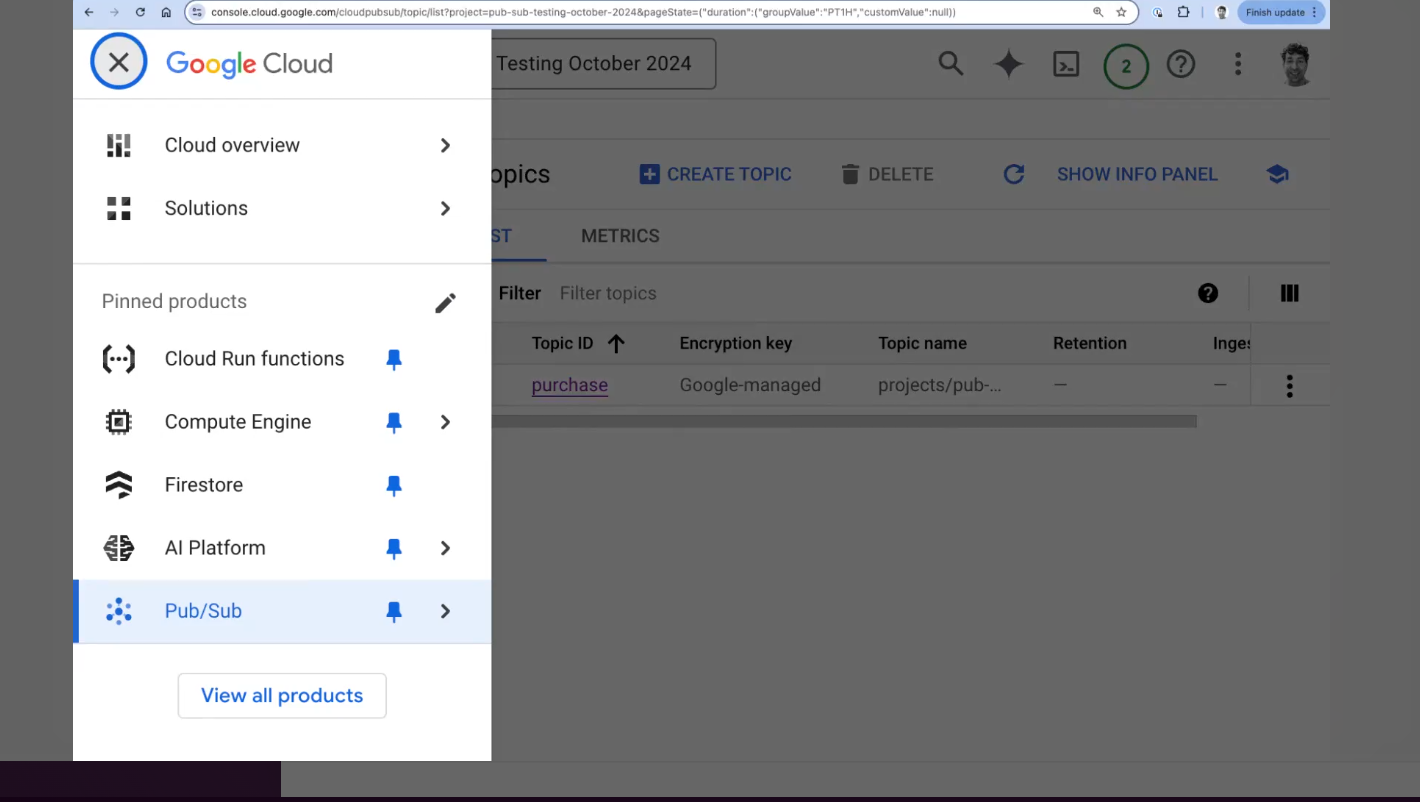
Figure 1
Create a Topic:
- Use the top navigation menu to locate and click on the "Create Topic" button.
- Navigate to the section of the page labeled "Topic ID" and use the text box to name your topic. As a best practice, the topic name should be clear and easy to recognize. For example, you might use "Elevar_pub_sub_topic".
- Locate the “Add a default subscription” option and ensure that it is unchecked.
- Once you have entered the required information, click on the "Create" button located at the bottom of the page.
- (See Figure 2)

Figure 2
Set Up a Cloud Run Function
Create Function:
- Once your topic is created, the next step is to set up a Cloud Run Function. Locate and click on the “Trigger Cloud Run Function” button located in the top right corner of the topic creation page.
- Navigate to the section of the page labeled "Basics" and use the text box to name your Cloud Run Function. Best practice is for the function name to be similar to the name of your topic. If you named your topic "elevar_pubsub_topic" then you might name your function "elevar_pubsub_function".
- (See Figure 3)

Figure 3
Edit Source Code:
- Navigate to the section of the page titled "Source Code" and locate the "INDEX.JS box. Within the INDEX.JS box, delete all code.
- Replace existing code in the INDEX.JS box with the provided code snippet. View this article for the provided code snippet.
- Ensure the text in the Entry point field matches line 3 of your pasted code.
- For example, if the Entry point field says "helloPubSub," then that’s what you should also see in line 3 of your code.
- If there’s a mismatch in names, correct it by updating line 3 of your code to match the Entry point field.
- Once you have entered all of the required information, click on the "Deploy Function" button located at the bottom of the page.
- (See Figure 4)

Figure 4
Set Up Elevar Permissions in Pub/Sub
Access IAM & Admin:
- Begin on the Google Cloud homepage and use the left-hand menu to located in the upper left-hand corner to click on the "Solutions" tab. An additional menu will appear, click on the "All Products" tab.
- Navigate to the section of the page labeled "Management" and click on the "IAM & Admin" tab.
- (See Figure 5)

Figure 5
Grant Access:
- Locate and click on the “Grant Access” button.
- Enter the Elevar-provided email in the “New Principals” field.
- Under the “Assign roles” field, search for and select the role "Pub/Sub Publisher."
- Once you have entered the required details, click on the "Save" button located at the bottom of the page to confirm these permissions.
- (See Figure 6)

Figure 6
Project Name and Topic Name:Take note of your Project Name and Topic Name in Google Cloud Pub/Sub. You will need them for the next phase of setup.
- You can find your Project Name at the end of your project URL after “?project=”
- Use the navigational menu in the upper left-hand corner of the page to open Pub/Sub and find your Topic Name listed under "Topic ID".
Add Pub/Sub as a Server-Side Destination
Locate Pub/Sub Destination:
- Begin on the Elevar Dashboard and use the left-hand navigation menu to access the "My Tracking” page.
- Once, in "My Tracking" select the "Add Destination" button in the upper right hand corner of the page.
- A side bar pop-up window will appear, titled "Add Destination".
- Within this pop-up, use the search function and type "Pub/Sub".
- Once the Pub/Sub destination appears from the search function, click on it.
- (See Figure 7)

Figure 7
Get Started:
- After locating and clicking on the Pub/Sub destination, you will be taken to overview screen.
- Click the "Get Started" button in the lower left-hand corner of the Overview box.
- (See Figure 8)

Figure 8
Integration Notes: Action Required Prior to InstallationIf you don't already have a Google Cloud Project (GCP), please create one, as well as a new topic in the project. And grant [email protected] publisher permissions to that topic.
Read this step to ensure that you have completed this.
Entering Pub/Sub Settings
Pub/Sub Settings:
- To get started, you will need to enter your Pub/Sub settings for the integration.
- Within the "Pub/Sub Settings" click on the "Google Project ID" box and enter your Google Project ID here.
- Navigate to the "Pub/Sub Topic ID" box and enter your Pub/Sub Topic ID here.
- If you have "Markets" enabled in your Shopify Source, you will see the "Markets" section in your Pub/Sub destination.
- Select either the "All Markets", "Specific market(s)", or the "No Market ID" button to specify which markets will send data to Pub/Sub.
- If you have selected "All Markets" navigate to the section titled "Destination Label" and use the text box to enter a label. This is how your destination name will appear across the Elevar app (e.g., My Tracking, Reports, History) and helps to identify your destination across our app, especially when you have multiple instances of the same destination.
- If you have selected "Specific market(s)", navigate to the section titled "Market Groups" and use the drop down menu to select the market groups to specify which market's data will be sent to this destination. Then, navigate to the box titled "Destination Label" and use the text box to enter a label. This is how your destination name will appear across the Elevar app (e.g., My Tracking, Reports, History) and helps to identify your destination across our app, especially when you have multiple instances of the same destination.
- Once you have entered all of the required information for your Pub/Sub settings, click on the "Save and Continue" button at the bottom of the section.
- (See Figure 9)

Figure 9
BigQuery Setup:
- Once you have entered your Pub/Sub settings, you can select whether or not to send data to BigQuery.
- Click on the "Yes" button to send your event data to BigQuery for querying and analysis using SQL. Then navigate to the section of the page labeled "Set Up BigQuery" and follow this guide. Once completed, click on the "Mark as complete" button.
- Click on the "No" button if you do not want to send event data to BigQuery for querying and analysis using SQL.
- (See Figure 10)

Figure 10
Select Events:
- Once you have entered your Pub/Sub Settings, you have to select the Event settings.
- Either click on the button labeled "Use best practices" or "Customize".
- Under the "Breakdown" menu, you will need to name each event you are passing to Pub/Sub. These events should match the event name for your event based conversions in Pub/Sub.
- After selecting what events you want to send, click on the "Save and Continue" button at the bottom of this section.
- (See Figure 11)

Figure 11
Learn About the Events and Properties Elevar Sends to Pub/SubRead this guide to learn more about the specific events and properties Elevar sends to Pub/Sub.
Consent:
- After selecting the Events settings, you will be prompted to enable Consent.
- To enable Consent, click on the "Yes" button. If you do not want to enable Consent, click on the "No" button.
- If consent is required, select what categories you’d like the shopper to agree to before tracking fires. [Learn More]
- Once you have all of selected all of the information for enabling Consent, click on the "Save and Continue" button at the bottom of this section.
- (See Figure 12)

Figure 12
Enabling Consent:By enabling consent, your marketing data processing will depend on:
- Your consent platform configuration
- How your visitors interact with the cookie banner
- What geolocation they visit the store from
That's why you may see a decrease in data across your marketing platforms and lower marketing campaign performance.
For EU Stores: If you are making your tracking setup consent compliant for the first time, you may see a 10-80% decrease in data across all of your marketing destinations.
Filter Transactions:
- After selecting details for Consent, you need to choose whether or not to filter transactions.
- If you would like to filter recurring orders, click on the "Yes, Block some transactions" button which blocks exchange and historical import orders.
- If you do not want to filter transactions, click on the "No, send all" button.
- Once you have all of selected all of the information for Filtered Transactions, click on the "Save and Continue" button at the bottom of this section.
- (See Figure 13)

Figure 13
Learn More: Filtering TransactionsThinking you may need to block additional orders? Learn how to block these orders in this guide.
Not sure if you need to block orders? Look at what Sales Channels you have in Shopify!
Go Live:
-
After completing all of the previous Pub/Sub Setup Steps, an Overview page will appear.
-
If all of the details within the Configuration Summary look correct, then click on the button labeled "Go Live" at the bottom of this section.
-
A pop-up window will appear, asking for a confirmation of your changes.
-
Click on the button labeled "Yes, Go Live".
- (See Figure 14)

Figure 14
Updated 11 days ago