How to Make New vs Returning User Data Available
Learn more about user data and how to enable new versus returning user data available for tracking.
Overview
Follow this guide to learn how to make new versus returning user data available for both server side and client side tracking.
Server-side:
In order to make new vs returning user data available to send server-side as described here, follow these steps.
Client-Side Order Status Page:
If your using the Order Status Page Additional Script box to load your Thank You page Elevar code, follow the below steps to make new vs returning user data available in the dl_purchase event.
Prerequisites:
- You must be upgraded to our Shopify Source:
- If you are not upgraded to our Shopify source, upgrade now and this data is included! Follow our upgrade guide.
- If you have installed your Shopify source before December 11, 2023 you'll need to update to the Custom Pixel to make the new vs returning user data available for your marketing destinations. This update adds "customer_order_count" parameter to the dl_purchase event allowing us to determine if a user is new or returning.
Required Changes
Update to the Custom Pixel:
- In your Elevar App navigate to My Tracking and select "Got to Update" in your Shopify Source.
- (See Figure 1)
 Figure 1
Approve Permissions:
- If prompted to approve permissions by clicking the Go to Shopify button and reinstall the Elevar App.
- This will provide access to the customer API data we use for getting the most accurate new vs returning customer data.
- (See Figure 2)
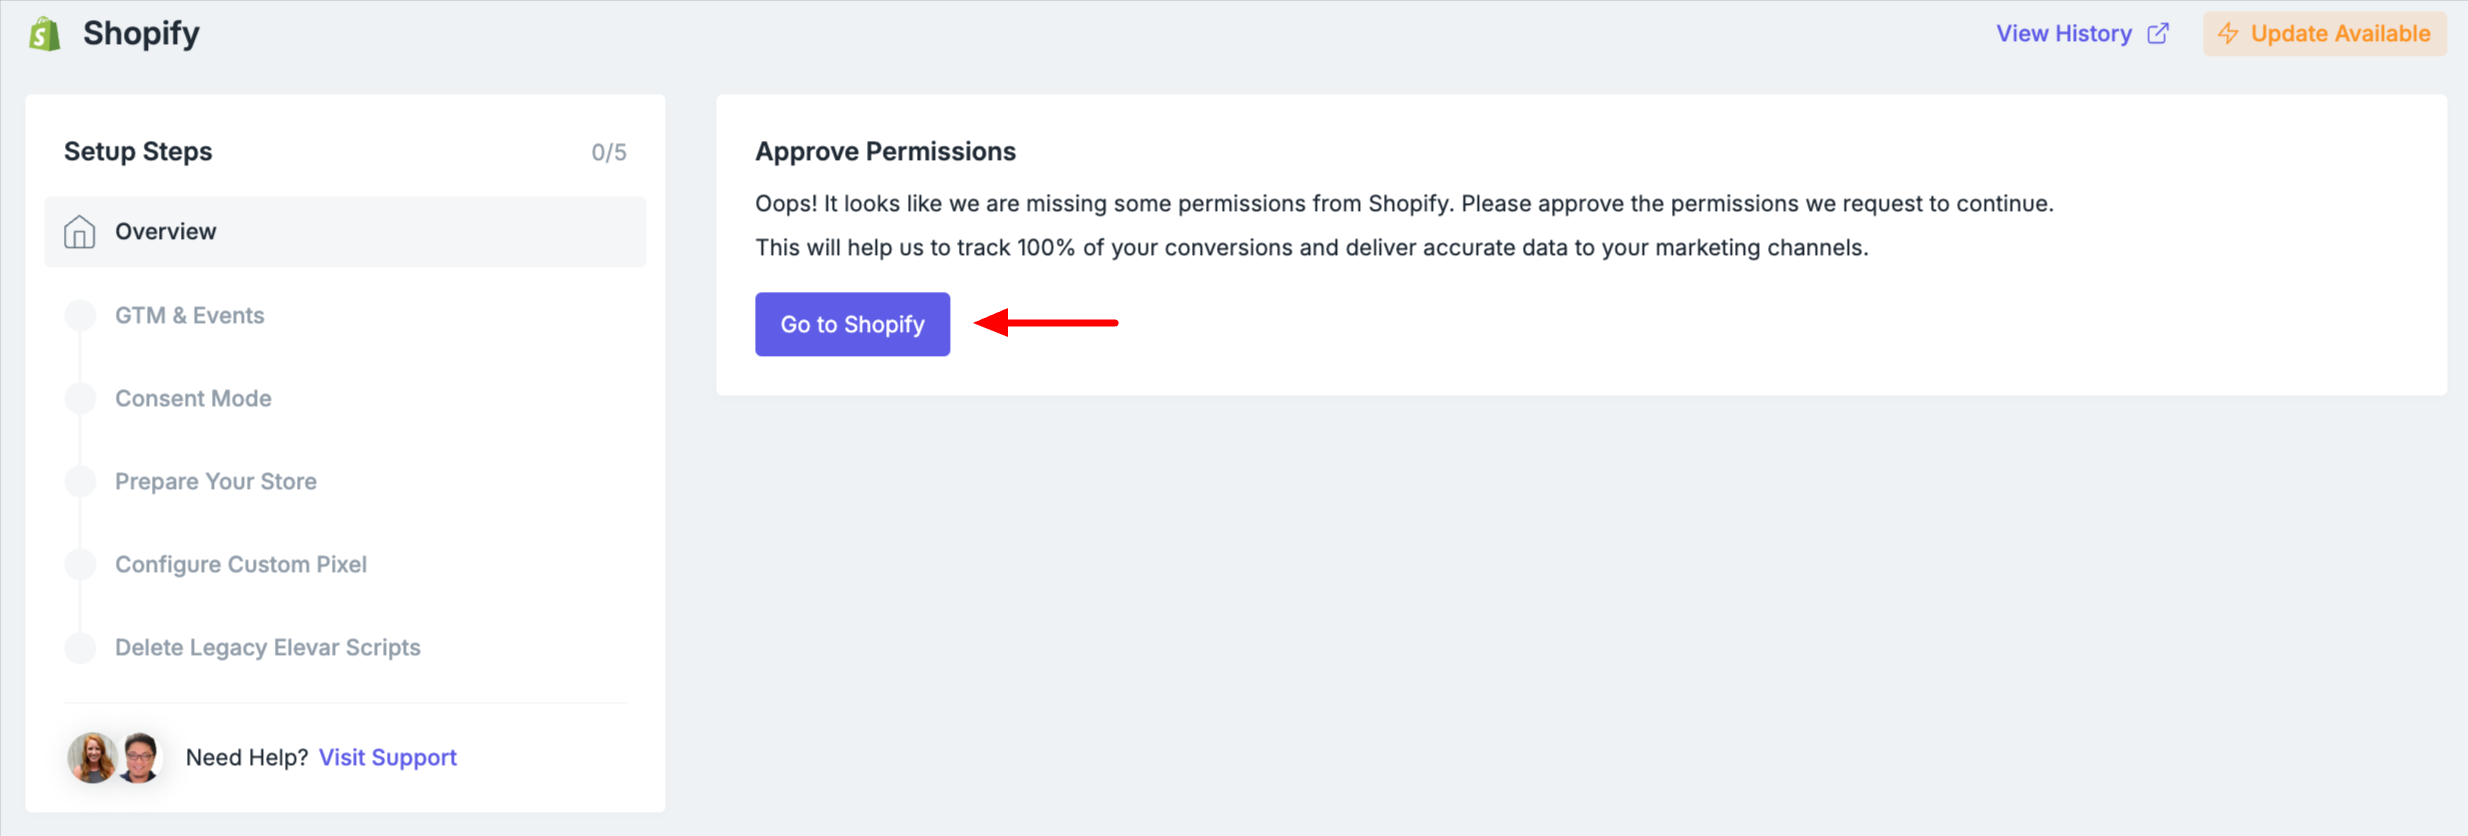 Figure 2
Configure Checkout Pixel, by following the in-app instructions"
- Copy the code by clicking the "Copy to Clipboard" button.
- Open your Customer Events Settings by clicking the link in app, or navigate within Shopify by going to Settings and then Customer Events.
- Click "Add a custom pixel" and name it "Elevar - Checkout Tracking" (If you don't already have a "Elevar - Checkout Tracking" custom pixel).
- Configure the Customer Privacy settings in Shopify (note: if your CMP doesn't integrate with Shopify's Customer Privacy API or you don't use a CMP at all, tracking may not fire for users in GDPR countries. If this is the case, you can set this setting to "not required").
- Paste the code from the above into the "Code" input box, click "Save", then "Connect".
- Return to the Elevar App, and click on the "Mark as Complete" button.
- (See Figure 3)
 Figure 3
Delete Legacy Elevar Snippets:
If applicable, remove any previous Elevar scripts from your checkout settings. Navigate to Shopify's Settings > Checkout > Order Status Page Additional Scripts box. (to prevent duplicate tracking should you revert from Thank You Extensibility).
If you have previously added post-purchase upsell tracking, updates are needed!
Follow this guide starting at Step 2, to update your post-purchase upsell tracking to avoid purchase duplication.
Update your web tags for Facebook and Snapchat:
Server-side purchases will automatically start passing the new vs returning user data, however the web tags in Google Tag Manager (GTM) need to be updated for Facebook and Snapchat.
- Facebook: Instructions to re-import your web tags
- Snapchat: Instructions to re-import your web tags
Done!
After you've completed the above steps, below are the updates you can expect to see:
| GA4 | Server-side purchase event will automatically start passing the following user parameters: total_order_count & customer_type (either New or Returning). You must set 'total_order_count' and 'customer_type' as a custom definition for this to take effect. This is done in GA4 by going to Admin > Custom Definitions > Create Custom Dimension. |
| Server-side purchase event will automatically start passing the customer_type parameter. Pre-built web tags updated to pass customer_type. You must re-import your web tags for this to take effect. | |
| Snapchat | Server-side purchase event will automatically start passing customer_status parameter. Pre-built web tags updated to pass customer_status. You must re-import your web tags for this to take effect. |
| Impact Radius | Server-side purchase event will automatically start passing the CustomerStatus parameter. |
| Awin | Server-side purchase event will automatically start passing the customeracquisition parameter. |
| Rakuten | Server-side purchase event will automatically start passing the custstatus parameter |
| Partnerize | Server-side purchase event will automatically start passing the customertype parameter. |
| ShareASale | Server-side purchase event will automatically start passing the newcustomer parameter. |
Updated 6 months ago