How to Set Up the Checkout Abandonment Flow with Elevar
Learn more about Checkout Abandonment Flows and how to integrate them with Elevar tracking.
Overview
Follow this guide to learn how to set up the Checkout Abandonment Flow with Elevar.
Understanding The Checkout Abdnonment Flow:
The Checkout Abandonment Flow is triggered when a user begins checkout but fails to complete the purchase. Elevar’s server-side tracking ensures higher reliability, especially when browser tracking fails. Follow this guide to learn how to set up the Checkout Abandonment flows with Elevar.
Understanding the Customer Journey:
A user clicks a product ad and lands on your website. A popup appears offering 20% off in exchange for their email address. The user submits their email and adds a product to their cart. They start the checkout process but abandon it halfway through. This action would trigger the Checkout Abandonment Flow.
What Makes This Flow Effective?
Even simple versions of the checkout abandonment flow generate strong results, but testing can take it further. Top performing brands segment by cart value, offer tiered incentives, or personalize follow-ups using Klaviyo’s A/B testing tools. Pairing this with Elevar’s enriched tracking helps you to capture more checkouts across browsers, devices and sessions to that you can have smarter segmentation and more complete customer journeys.
Prefer to Watch a Video?Watch this video for an in depth walk through of how to set up Klaviyo's checkout and cart abandonment flows and analyze performance.
Email Capture Pop-Up Integration for Elevar:To ensure that Elevar enhances the performance of your checkout, cart, and checkout abandonment flows, we need to capture the
dl_subscribeevent when customers submit their email address through the email capture pop-up on your homepage.
- Native Pop-Up Support: If you are using Klaviyo, Attentive, or Postscript native pop-ups, Elevar supports them out of the box, and no additional action is required.
- Third-Party Pop-Ups: For pop-ups from platforms like Amped.io, ConvertFlow, Justuno, or any other third-party email capture solutions, you will need to add extra code to the pop-up to ensure compatibility with Elevar’s data layer.
Follow this guide to learn more information on email sign up tracking!
How to Set Up the Checkout Abandonment Flow with Elevar
Clone the Existing Flow:
- Begin by duplicating your existing Klaviyo Checkout Abandonment flow.
- Be sure to rename the flows something to make them identifiable (e.g., Checkout Abandonment – Elevar). This keeps your original flows intact while you test and validate the boosted versions.
- (See Figure 1)

Figure 1
Change the Trigger:
Change the trigger to: Viewed Product - Elevar SS.
- Once you have updated the clone name, navigate to the section titled "Tigger" and use the drop-down menu to select the appropriate Elevar-tracked event (e.g.,Viewed Product - Elevar SS)
- Once you have updated the trigger for the flow, click on the "Clone Flow" button located in the bottom right-hand corner of the window
- (Figure 2)

Figure 2
Add a Flow Filter:
- To prevent customers from entering multiple flows for the same funnel step, ensure that you review the profile filters for each flow.
- Once you have accessed a specific flow, locate and click on the "Trigger" box.
- Navigate to the section of the window titled "Profile Filters" to view and edit the trigger so that it applies to only certain profiles.
- (See Figure 3)
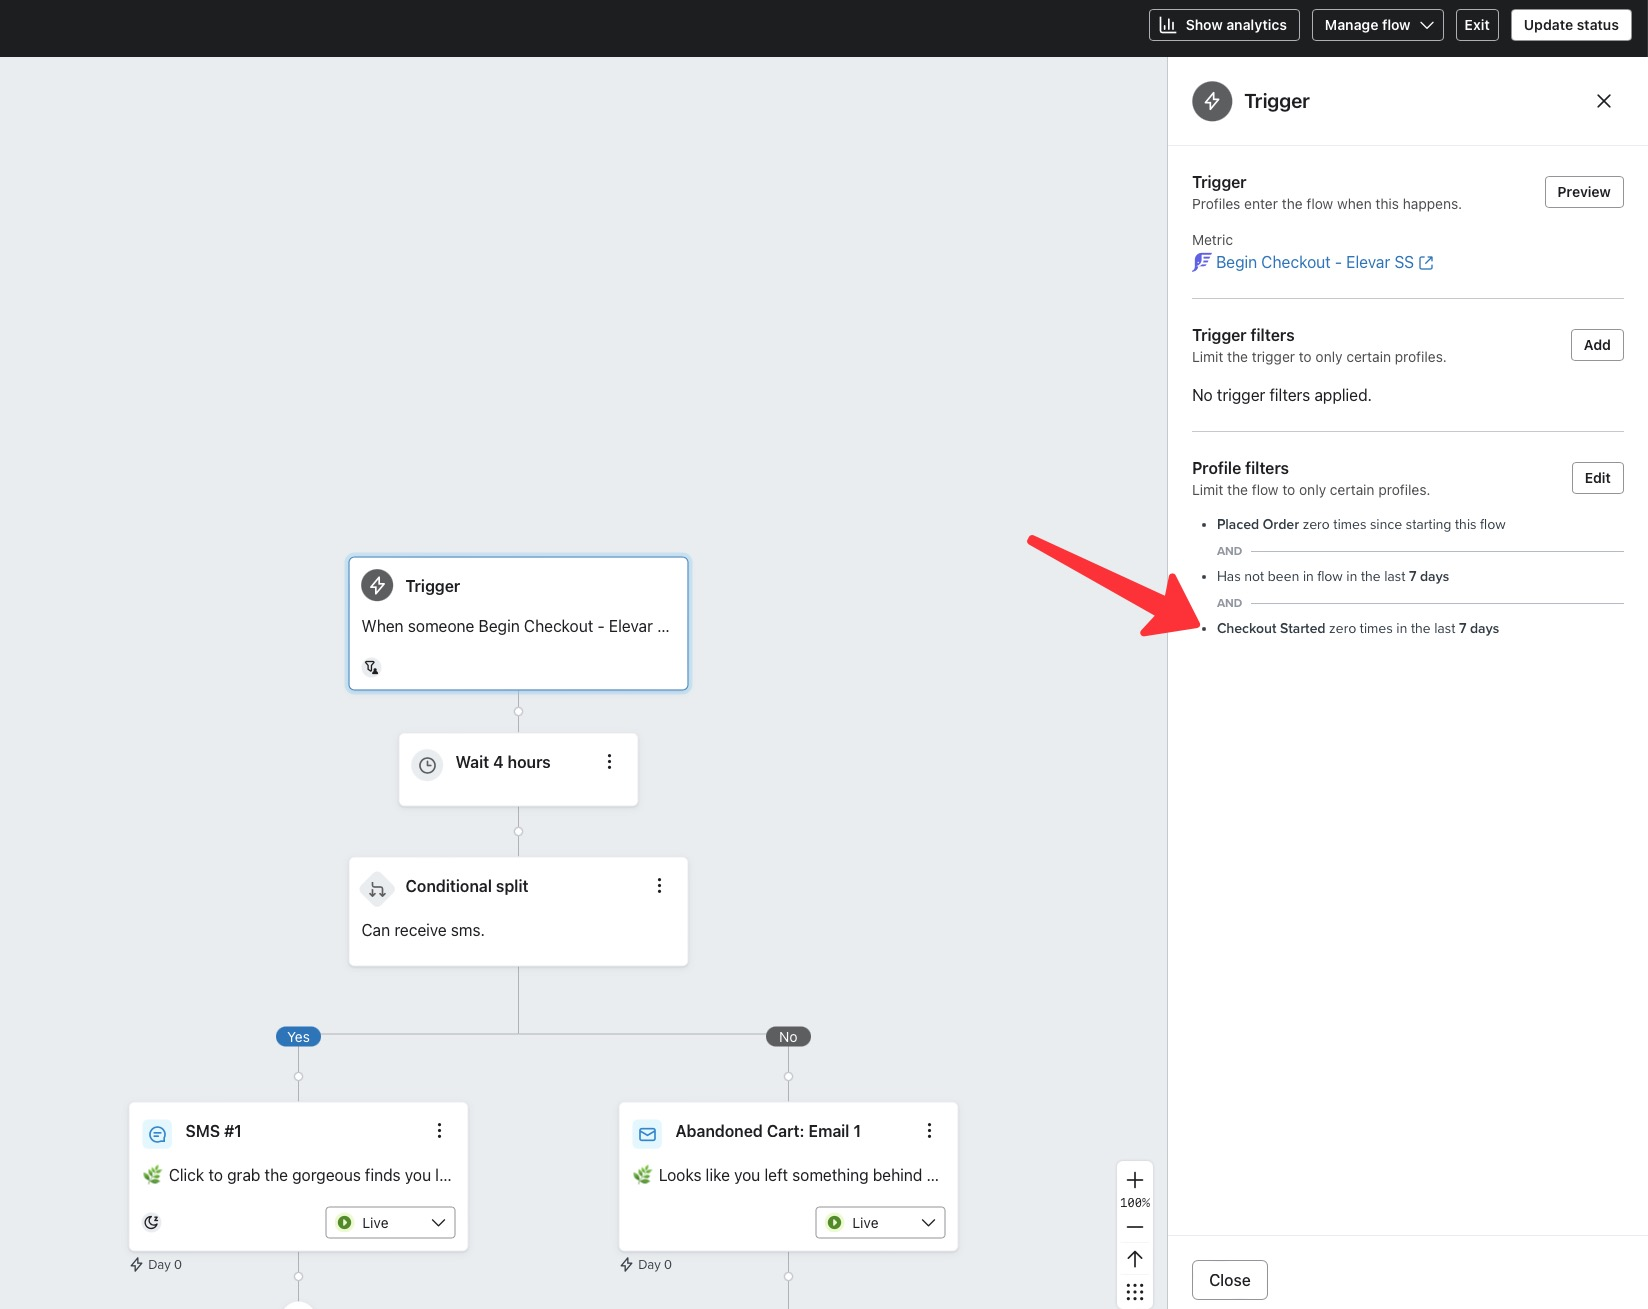
Figure 3
Review Elevar Tracking Setup
- Begin on your Elevar homepage and use the left-hand navigation menu to click on the "My Tracking" tab. Locate the Shopify Source and upgrade to the latest data layer if needed.
- To ensure dl_subscribe events are captured:
- Native pop-ups (Klaviyo, Attentive, Postscript) work out-of-the-box.
- Third-party pop-ups (Amped, ConvertFlow, etc.) need extra setup.
Reporting and Analysis
Quickly View Performance of Elevar Flows:
You don’t need to create a custom report to analyze the performance of your Elevar enhanced flows. Instead, follow these simple steps inside of your Klaviyo account.
Quickly View Performance of Elevar Flows:
- Begin on your Klaviyo homepage and use the left-hand navigation menu to click on the "Flows" tab.
- Once on the Flows page, use the search bar function to locate your Elevar flows (e.g., those named “Browse Abandonment – Elevar”). Additionally, navigate to the section titled "Status" and use the drop-down menu to select the "Live" option.
- From here, you can view revenue generated in the last 30 days from each flow! This approach gives you a clear snapshot of Elevar’s impact on your flow-driven revenue.
- (See Figure 4)
- From here, you can view revenue generated in the last 30 days from each flow! This approach gives you a clear snapshot of Elevar’s impact on your flow-driven revenue.

Figure 4
Updated 7 months ago