How to Locate and Automate Order Tags in Shopify
Overview
Follow this guide to learn how to manually apply tags, automate order tagging using Shopify Flow, and block specific orders from tracking in Elevar using order tags.
Order tags in Shopify allow merchants to label and organize orders based on custom criteria like customer type, order value, or promotions used. With Elevar, you can further use these tags to block or filter orders from being sent to your marketing destinations (like Facebook, TikTok, or GA4).
How to Manually Add Order Tags in Shopify
Access the Orders Page:
- Begin on your Shopify homepage and use the left-hand navigation menu to click on the "Orders" tab.
- (See Figure 1)

Figure 1
Add or Create a Tag:
- On the Orders overview page, navigate to the "Tags" column to access existing tags.
- To add or create a new tag, click on the desired order.
- Navigate to the "Tags" section on the order page.
- Use the text box to enter the new tag. New tags are automatically saved for future use.
- (See Figure 2)

Figure 2
Learn More: How to Block Order Tags (General)You can block or filter orders from any marketing destination based on their order tags in Elevar.
Read this guide for full instructions on blocking by App ID, Customer Tag, Order Tag, Source Channel, and more.
How to Automate Order Tagging with Shopify Flow
Create Workflow:
- Begin on your Shopify homepage and use the left-hand navigation menu to click on the "Apps" tab. Then, navigate to the Flow app.
- Once on the Flow page, click on the "Create workflow" button located in the upper right-hand corner of the page.
Configure Automated Workflow:
- Create a Shopify Flow adding the "Wholesale" order tag in the specific order
- This automation ensures consistent tagging without manual intervention, making it easier to organize orders and set up automated tracking rules.
- (See Figure 3 and 4)

Figure 3
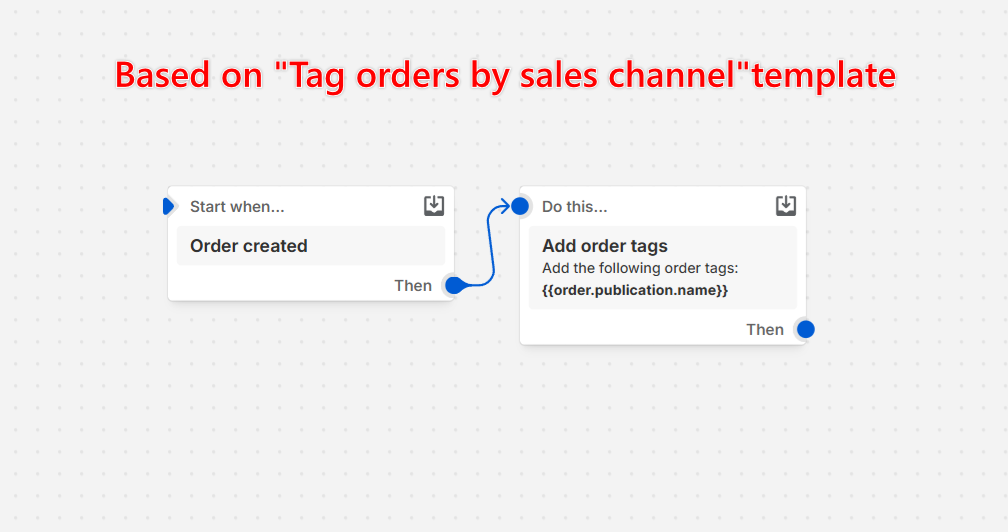
Figure 4
Learn More: Shopify Flow TemplatesExplore this guide for Shopify Flow templates and detailed examples.
Access Destination
- Begin on your Elevar homepage and use the left-hand navigation menu to click on the "My Tracking" tab.
- Once in My Tracking, locate and click on the desired destination card.
- (See Figure 5)

Figure 5
Block Wholesale Orders in Elevar:
- Once in the desired destination, use the "Setup Step" box and click on the "Filter Transactions" tab.
- Navigate to the section of the page titled "Would you like to filter recurring orders?" and and click on the "Yes, block" button. Then, navigate to the section of the page titled "Would you like to filter any other transactions?" and click on the "Yes, block some transactions" button.
- Then, navigate to the section of the page titled "Block some transactions" and select the "Customize" option.
- Locate and click on the "Add Filter" button. An additional menu will appear, click on the "Order Tag" option.
- Use the text box to enter the name of the wholesale order tag.
- Once you have entered the required information to block wholesale orders , click on the "Save" button located at the bottom of the page.
- (See Figure 6)

Figure 6
Confirm Successful Tagging and Blocking:
- Test your workflow by placing a wholesale test order.
- Confirm that the order was correctly tagged and is excluded from Facebook tracking.
- (See Figure 7)

Figure 7
Important: Conflicting TagsWhen automating or manually adding order tags, conflicting tags can unintentionally trigger multiple workflows or disrupt your tracking filters.
Example: An order tagged as both “Wholesale” and “Employee Purchase” might accidentally bypass intended tracking rules.
To prevent issues:
- Standardize your tag naming conventions.
- Minimize overlap between different automation flows.
- Test your Shopify Flow and Elevar filters regularly.
Updated 7 months ago