How to Reduce Unassigned or Direct None Traffic and Revenue Attribution in GA4
Learn why revenue shows as unassigned in GA4—and how to fix it with UTMs, GA4 overrides, and checkout best practices.
Overview
Follow this guide to learn the most common reasons why traffic and transactions are attributed to unassigned or direct/none instead of a paid channel.
Understanding Unassigned or Direct None Traffic and Revenue Attribution:
Part of our mission at Elevar is to reduce the total number of orders that have no meaningful attribution on transactions inside of Google Analytics 4 (GA4).
When analyzing attribution in GA4, it’s common to see some transactions labeled as “unassigned” under the Session Default Channel Group dimension. It’s important to note that seeing “unassigned” does not automatically indicate an error in your tracking setup. This value simply means that the session source/medium combination doesn’t match any of GA4’s default channel group definitions, essentially acting as a “catch-all” bucket.
That said, while “unassigned” on its own doesn’t confirm a setup issue, it can be a sign that there’s an opportunity to improve your UTM tagging or tracking configuration to ensure better classification within GA4’s reporting.
To reduce unassigned or direct/none traffic in revenue attribution in GA4, ensure that you are tagging all of your inbound URLs with UTM parameters.
Examples:
- Profile links on social media
- Links shared in social media posts
- Advertising links on social platforms
- Links from content promotion, podcasts, etc.
Important: You should not add UTM parameters to links within your own website (e.g., homepage banners or internal navigation), as this can disrupt session attribution and cause inaccurate reporting.
Offline Channel Purchases Sent to GA4 without a Source/Medium Override
If you are sending purchases to GA4 via Elevar's server-side transactions then please follow this step closely. It's possible you have orders being created in your store besides just Online Store.
- (See Figure 1)
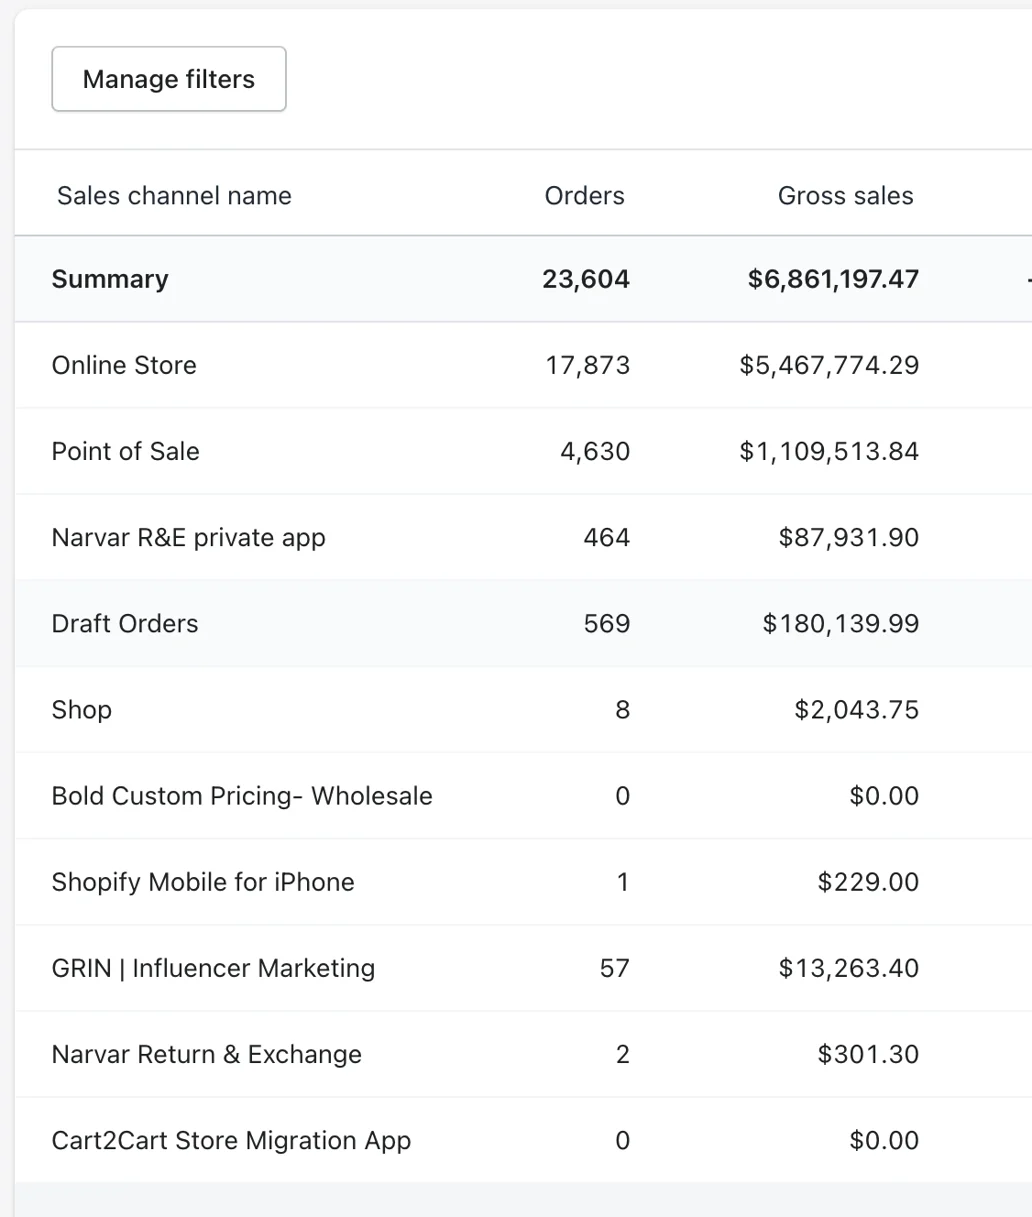
Figure 1
FIlter Transactions:
- All of these additional orders will be sent to Google Analytics unless you choose to block these in your GA4 Destination Settings.
- Begin on the homepage of your Elevar App. Use the left-hand menu to click on the tab labeled "My Tracking". Once on the "My Tracking" page, click on the GA4 destination.
- In the GA4 destination, use the box titled "Setup Steps" and click on the tab labeled "Filter Transactions".
- Navigate to the section titled "Would you like to filter some transactions?" and click on the button labeled "Yes, Block some transactions".
- Then navigate to the section titled "Block some transactions" and click on the button labeled "Use Best Practices".
- Be sure to save your changes by clicking on the "Save" button at the bottom of the page.
- (See Figure 2)

Figure 2
GA4 Settings:
- If you want to send some of channel orders to GA and they are truly an offline channel that doesn't have physical checkout the user goes through, then it's likely these orders will display at 'unassigned' as no source/medium is provided. You can override this by setting a custom source/medium in the Advanced Options.
- Begin on the homepage of your Elevar App and use the left-hand menu to click on the tab labeled "My Tracking". Once on the "My Tracking" page, click on the GA4 destination. In the GA4 destination, use the box titled "Setup Steps" to click on the tab labeled "GA4 Settings".
- Navigate to the section titled "GA4 Settings" and click on the button labeled "Prefer GA Cookie".
- Then locate and click on the button labeled "Customize by Channel".
- Here you can use the following text boxes to imput your channel code, campaign source, capaign medium, and campaign name.
- Be sure to save your changes by clicking on the "Save" button at the bottom of the page.
- (See Figure 3)

Figure 3
Checkout Landing Pages on Non-Plus Shopify Websites or Plus Stores using Checkout Extensibility
If you are a non-Plus store then it's highly likely that Google Tag Manager (and Elevar's data layer) is not available on the checkout pages.
If this is the case, then when a user comes into your site via an SMS abandoned cart link that goes straight to the checkout page, Google Analytics will not execute, nor will Elevar be able to grab the UTMs and set on the order notes or store them offsite.
The Solution:
- Use Elevar's Fully Managed Server + Update your DataLayer to the 2.42+ version
- Send links to your cart page and allow visitors to navigate to the checkout from the cart page.
Buy Now Buttons Auto-Redirecting to Checkout
This is a known limitation that Shopify outlines in their docs here.
Essentially Shopify does not support cart attributes because the "buy now" button technically creates a new checkout for the user session and thus loses any pre-existing UTM and attribution data stored on the session from the original inbound link.
This means the order notes that Elevar sets on the session and uses in the GTM server-side container setup do not exist when a user clicks buy-now button.
The Solution:
- Use Elevar's Fully Managed Server + Update your DataLayer to the 2.35+ version
- If you have a high % of customers utilizing this we recommend turning off the server-side conversion and using the GTM web container purchase event.
We're actively investigating solutions to this issue.
Third Party Checkout Apps That Don't Persist Order Notes
This issue is fairly rare now that many third party apps are utilizing the native Shopify checkout OR they support Shopify's cart attributes that are used to store UTM information on order notes.
ReCharge, Carthook, Zipify, Bold, Upscribe, Smartrr all function normally with Elevar's server-side setup.
But if you are using a third party checkout app that takes the user outside of the Shopify checkout experience then you will need to verify that the order notes exist on orders placed inside the Shopify Admin > Orders > view individual order
- (See Figure 4)
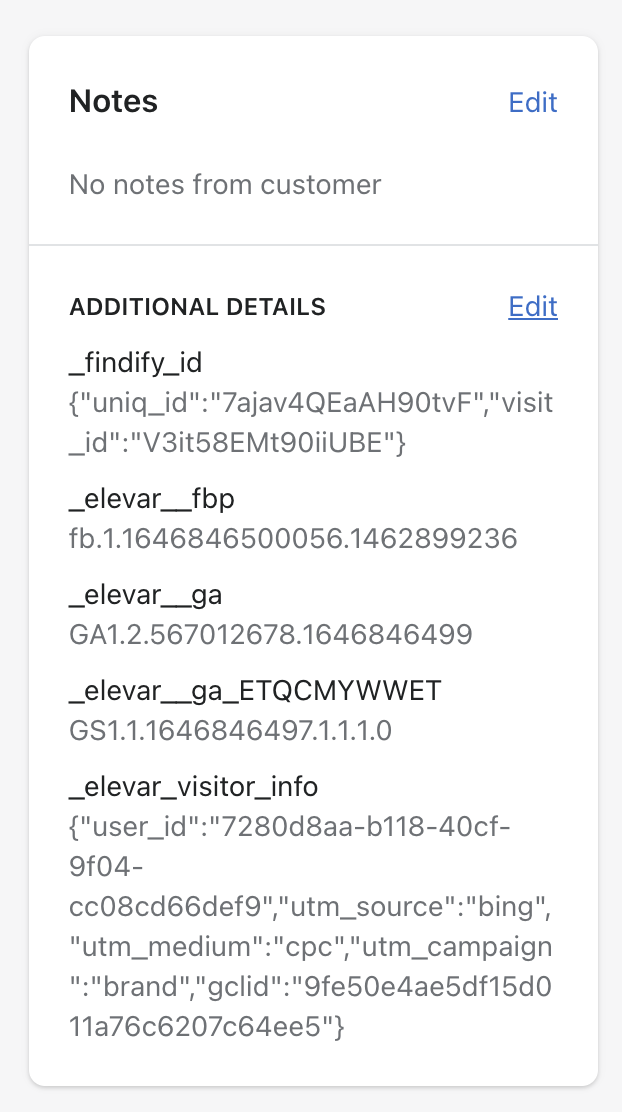
Figure 4
If you find the you have orders that do not have orders notes, first check that you are saving order notes in your data layer.
- Begin on the homepage of your Elevar App.
- Using the left-hand menu, click on the tab labeled "My Tracking".
- Once on the "My Tracking" page, click on the GA4 destination.
- In the GA4 destination, use the box titled "Setup Steps" and click on the tab labeled "GTM Details".
- Navigate to the section titled "Event Breakdown" and click on the expand button.
- If you have Save Order Notes checked, this means your order notes should be set and they are likely being overwritten by your third-party checkout.
- (See Figure 5)
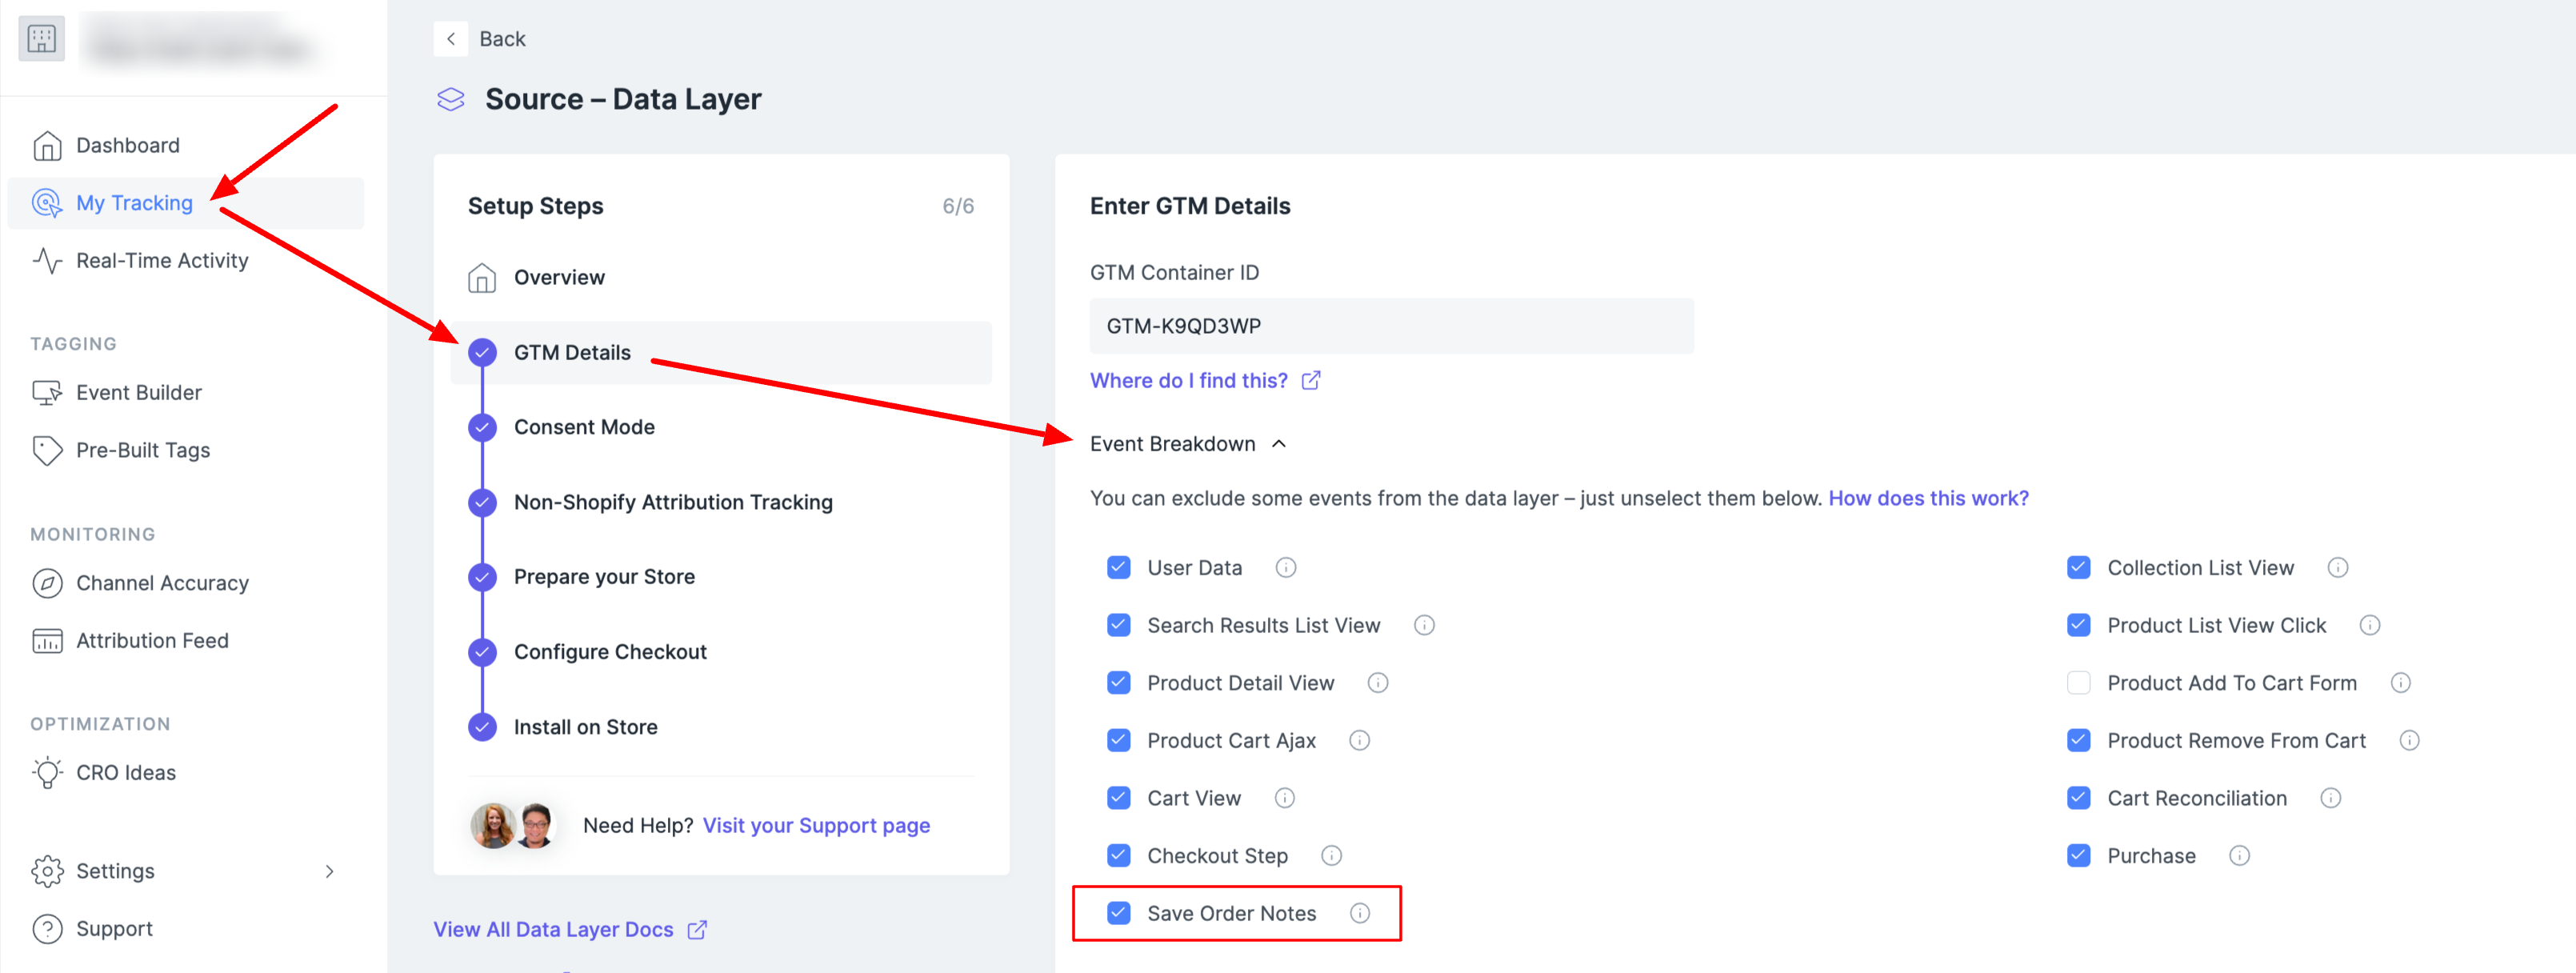
Figure 5
Your Server-Side GA4 Property Is Live Less Than 7 Days
In most cases you will want your new property (if you are utilizing a new property to test) to run for 2-4 weeks to ensure that session data catches up.
GA4 uses data driven attribution with different scopes depending on report scope.
In this scenario...
- User clicks FB ad on desktop on Monday
- You launch new GA property on Tuesday
- User comes back direct to website on Wednesday and completes purchase
Your pre-existing GA4 property will have user based reports attributing to FB, and the session and event based reports a blend of FB and Direct.
But your new GA4 property all reports will attribute to direct because it does not have the stored session data from Monday's first visit to consider in the blended model.
Are your ads properly tagged with UTM parameters?
Destinations like Facebook won't automatically add UTM parameters to your ad links, but Google Analytics requires UTM parameters in order to properly attribute paid traffic.
It's not just enough to add UTM parameters, but also make sure that the casing works.
Here are some best practices:
Don't use double question marks:
Let's say you're sending Paid Facebook Traffic to a specific variant on your product page. The URL you want to use is website.com/product?variant=123.
Your UTM parameters should be formatted like this:
website.com/product?variant=123&utm_source=ig&utm_medium=cpc&utm_campaign=exampleAnd should not be formatted like this:
website.com/product?variant=123?utm_source=ig&utm_medium=cpc&utm_campaign=exampleUse hyphens instead of spaces:
Format your UTMs like this:
&utm_source=ig-banner-adInstead of this:
&utm_source=ig banner ad