How to Block Orders from Being Sent
Learn how to block specific orders from being sent to your marketing destination.
Overview
Learn how to block orders from being sent and what you can block orders based on.
How to Block Orders from Being Sent
In each of your destinations, there is a Filter Transactions step that allows you to customize what transactions should be sent to that destination.
Navigating to the Filter Transaction Step:
- Begin on your Elevar homepage, and use the left-hand menu to click on the "My Tracking" tab.
- Click on your Marketing Destination.
- Under the Destination's Setup Steps, click on the tab labeled "Filter Transactions".
- (See Figure 1)

Figure 1
Customizing How Orders Get Blocked
You are able to block orders based on Source Channel Codes, Order Tags, Order Gateways, and Customer Tags.
Source Channel Codes:
- A source channel code is a unique code assigned to the app that creates the Shopify Order.
- For instance, all orders that are placed on your online Shopify checkout have a source channel code of "web". Whereas all orders that come from your Shopify POS have a source channel code of "pos".
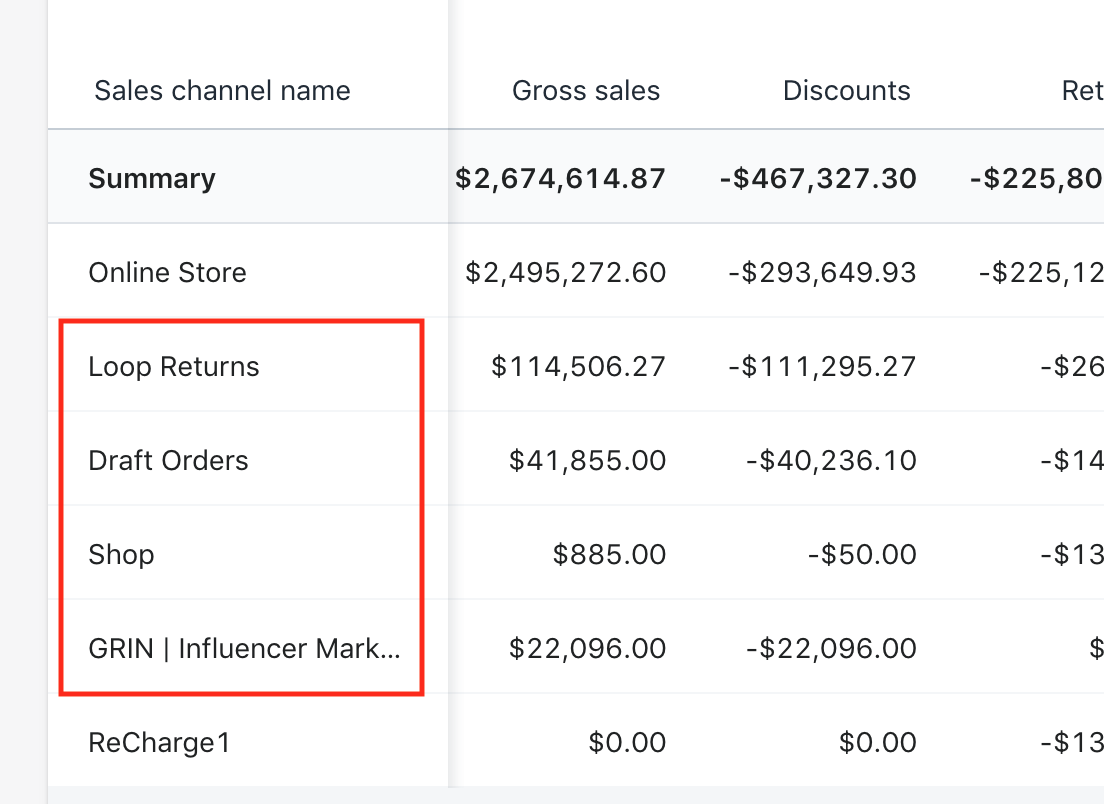
How do I know what Sales Channels my shop is using?
- If you have purchased Shopify's Sales by Channel report, this is an easy way to see what Sales Channels you currently have in place.
- To access this report in Shopify, use the left-hand menu to click on the "Analytics" tab. An additional drop-down menu wil appear, click on the "Reports" tab.
- Navigate to the section of the page titled "Sales by Channel" and here you'll see an overview of what Sales Channels are currently in place.
- (See Figure 2)
 Figure 2
How do I find what source_name to add a custom channel?
Watch the below video to be guided on how to find your order's source_name:
Do not simply find a channel name in Shopify and input into the other setting. This will not work. Please watch the video to learn how to find this source_name.
Order Tags:
- An order tag is a tag that is added to a Shopify Order.
- (See Figure 3)
 Figure 3
- Subscription softwares will often add "First Subscription Order" tags and "Subscription Recurring Order" tags to easily differentiate between first subscription orders and recurring orders.
- You can choose to block specific orders based on Order Tag in the Advanced section of the Block Transaction step.
- (See Figure 4)

Figure 4
Order Gateways:
- The order gateway is the payment method that the shopper used. Look at the source code of an order (by adding ".json" to the end the URL when viewing an order in Shopify) to find the gateway code.
- (See Figure 5)
 Figure 5
- You can choose to block specific orders based on Order Gateway in the Advanced section of the Block Transaction step.
- (See Figure 6)

Figure 6
Customer Tags:
- A customer tag is a tag added to the Customer Profile in Shopify.
- (See Figure 7)

Figure 7
- You can choose to block specific orders based on Customer Tag in the Advanced section of the Block Transaction step.
- (See Figure 8)

Figure 8
App Id:
- An App Id is a unique identifier for the application that created the order (e.g Facebook Sales Channel, Tapcart, Plobal).
How to find app_id
- You can find your app_id by adding ".json" to the end the URL when viewing an order in Shopify. Then locate the "app_id:" line. See the figure below for an example of where to locate the app_id.
- (See Figure 9)
 Figure 9
Filtering Transactions:
- You can choose to block orders base on the app_id. For example if you are using Tapcart, and you want to exclude all Tapcart orders then you can block by the app_id. This way, even if customers are using Shop Pay, you can still block them from being sent.
- To do this, you need to access your destination and navigate to the "Filter Transactions" section. Then use the customization option to add a new filter. Select "App" as the filter and input the app_id of the application that you wish to block. See the figure below for an example situation.
- (See Figure 10)

Figure 10
Common Blocking Scenarios
Below are a few common scenarios where you may want to block transactions from being sent to your destination:
Offline Orders:
- Do you want to send offline orders like Draft Orders, Point of Sale Orders, etc to your Marketing Destination or do you only want to send orders placed on your online Shopify checkout? This is a business decisions for your team to make.
How to Block:
- If you don't want to send offline orders to your Marketing Destination, you can set up the destination to only allow orders where the sales channel is
web. (Note: If your website is headless or uses non-shopify checkouts, you will need to include these sales channels in your logic)- (See Figure 11)

Figure 11
Test Orders:
- If your team places test orders and would like to block those orders from being sent to your marketing destinations, you can tag your team's customer profiles in Shopify (e.g. add an "InternalUser" customer tag) and then block all orders where the the customer is tagged with "InternalUser".
- (See Figure 12)

Figure 12
Updated 6 months ago
Did this page help you?