Help! Shopify Is Still Loading My Meta (Facebook) Pixel Even Though I've Removed It From The Native App
Diagnose and fix duplicate Meta (Facebook) events caused by a cached Pixel in Shopify’s Trekkie Load after migrating to GTM.
Overview
Follow this guide to learn more about Meta (Facebook) Pixel issues and how to troubleshoot when your Facebook Pixel is still cached in Shopify's Trekkie Load.
Scenario:
After integrating Meta (Facebook) tracking via Google Tag Manager (GTM) and removing your Meta (Facebook) Pixel from the native Facebook App, you may encounter an issue where duplicate events are being fired. This problem typically arises when Shopify’s internal cache still includes your Facebook Pixel tracking code, despite its removal from the app.
The Issue:
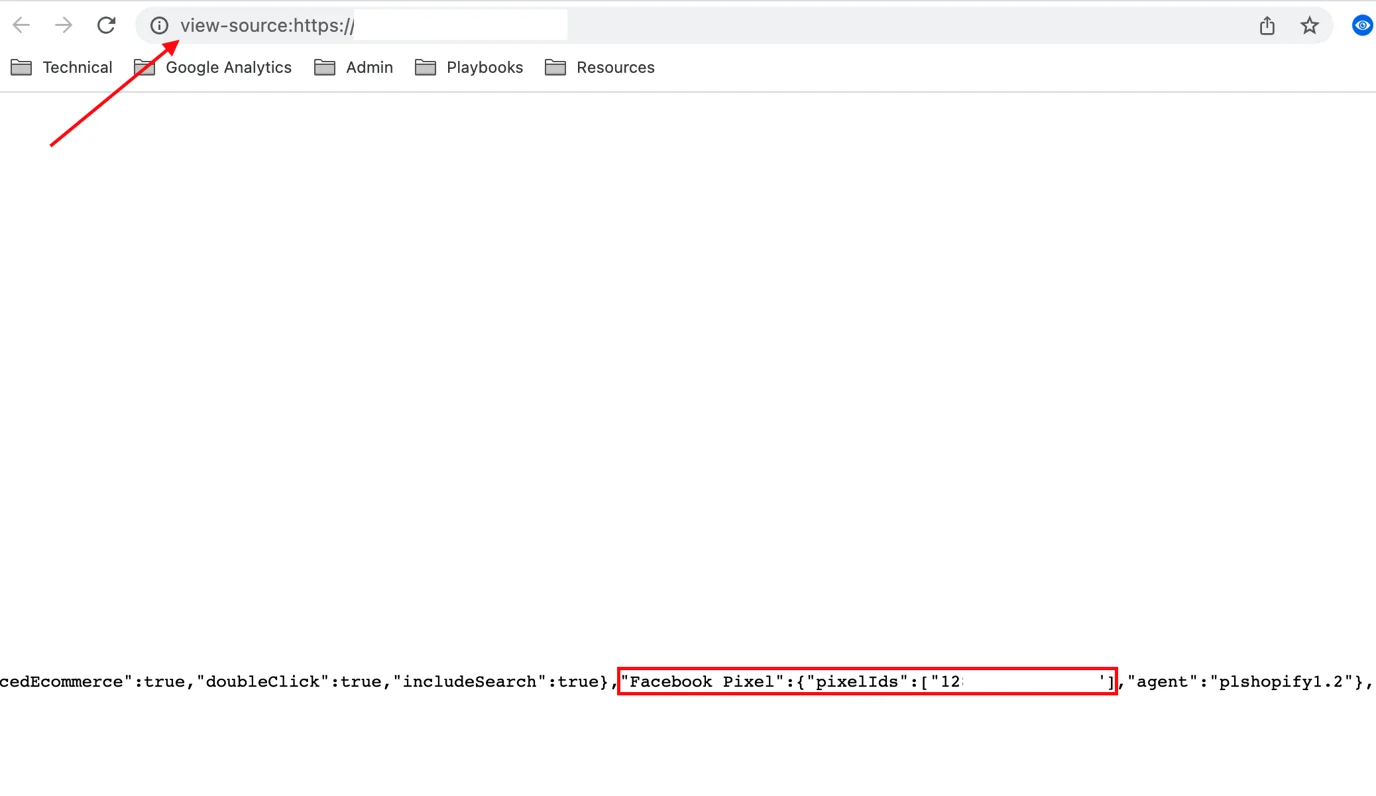
- If you inspect the page source and search for "Meta (Facebook) Pixel," and find your Pixel ID present, it indicates that Shopify has cached the Meta (Facebook) Pixel in its Trekkie Load, causing duplicate event firing.
Troubleshooting Steps
Below are some troubleshooting options if this is happening in your store:
Option A: Enable the Meta (Facebook) Pixel Tracking in App and then Disable it again.
- In your Meta (Facebook) Sales Channel App, navigate to Settings.
- Once in the settings locate and click on the "Data Sharing" settings. Toggle the switch next to Enable Tracking.
- Select "Connect" button that is located next to your Meta (Facebook) Pixel.
- Now, to disable the tracking, start by selecting the "Disconnect" button next to your Meta (Facebook) Pixel.
- Toggle the switch next to Enable Tracking so that it's off.
- View your website in an incognito window & see if you can find your Meta (Facebook) Pixel in your source code.
- If you can't, then you've successfully uncached your Meta (Facebook) Pixel from Shopify! If you can, continue down to Option B.
- (See Figure 2)

Figure 2
Option B: Remove the Meta (Facebook) Shopping Channel, Re-install it, and then Disable the Meta (Facebook) Pixel in App
- In your Shopify Admin, navigate to Settings.
- Once in the settings locate and click on the "Sales Channels" button.
- Select the "Remove" button next to Meta (Facebook).
- Next, to re-install the Meta (Facebook) Sales Channel, select "Add Sales Channel".
- Find Meta (Facebook) and press the green plus button to install the Meta (Facebook) Sales Channel.
- Walk through the steps to re-setup the Meta (Facebook) Sales Channel including connecting your Meta (Facebook) Pixel.
- Finally, to disable the Meta (Facebook) Pixel in the Meta (Facebook) Sales Channel, navigate to Settings and then the "Data Sharing" Settings.
- Select the "Disconnect" button next to your Meta (Facebook) Pixel.
- Toggle the switch next to Enable Tracking so that it's off
- View your website in an incognito window again & see if you can find your Meta (Facebook) Pixel in your source code.
- If you can't, then you've successfully uncached your Meta (Facebook) Pixel from Shopify! If you can, continue down to Option C.
- (See Figure 3)

Figure 3
Option C: Pause your GTM Meta (Facebook) Tags and Contact Shopify Support.
- In Google Tag Manager Account, navigate to Tags.
- Search for Meta (Facebook) > Select all your Pre-Built Meta (Facebook) tags > Select the pause icon.
- Publish these changes by selecting Submit > then Publish in GTM.
- Contact Shopify's Support Team about your Meta (Facebook) tracking still loading from the Shopify Trekkie.
Updated 7 months ago
Did this page help you?