Verify Tag Monitoring Setup
View the steps required for enabling tag and data layer error monitoring on your account
Overview
Need to confirm your account is set up for monitoring? This guide will show you what to check for.
Confirm Elevar Base Monitoring Tags:
Access Account Tags:
- Begin on your Google Tag Manger homepage and use the left-hand menu to click on the "Tags" tab.
- Locate the "Elevar Monitoring Core Tag" tag and the "Elevar Monitoring Tag Info" tag.
- (See Figure 1)

Figure 1
If you do then you're all set!
(Optional) Install Base Container:
- If you do not have the Elevar Base Container Tags, then you will need to install them.
- Begin on your Elevar homepage and use the left-hand menu to click on the "Pre-Built Tags" tab.
- Use the search function to locate and install the Base Containers
- (See Figure 2)
- Use the search function to locate and install the Base Containers
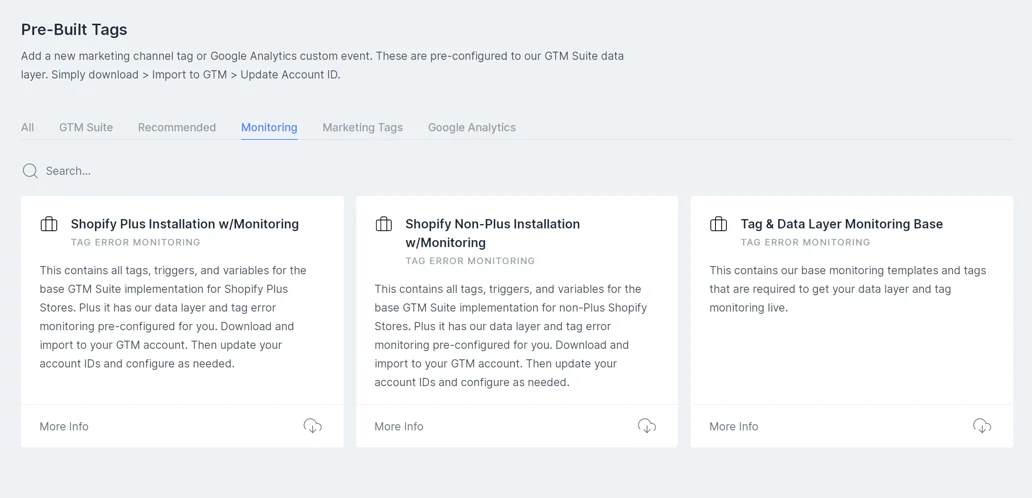 Figure 2
Data Layer Variables Updates
User-Defined Variables:
- Begin on your Google Tag Manager homepage and use the left-hand menu to click on the "Variables" tab.
- Navigate to the "User-Defined Variables" section of the page.
- Use the search function to locate all of the Elevar Monitoring Variables.
- (See Figure 3)
 Figure 3
Confirm Data Layer Key:
- Click on the first variable from this list of Elevar Monitoring Variables.
- Ensure the Data Layer Key is the actual data layer variable key, not the data layer name.
- If you've used our Pre-Built tags then you don't have to worry about this - it's been configured for you.
- (See Figure 4)
- If you've used our Pre-Built tags then you don't have to worry about this - it's been configured for you.
 Figure 4
Important: If you are recreating this yourself instead of using our pre-built containers then be sure you follow our guide on this configuration closely.
Marketing Tags Updates
Marketing Tags:
- Begin on your Google Tag Manager homepage and use the left-hand menu to click on the "Tags" tab
- Ensure your marketing tags have the settings enabled to capture errors in your dashboard.
- If you don't configure this properly then we won't be able to match data layer errors to the tags. You will still see data layer errors in your account if they exist.
- If you've used our Pre-Built tag recipes then this is done for you.
- (See Figure 5)

Figure 5
Connect GTM To Your Account
Access Elevar Account Settings:
- Begin on your Elevar homepage and use the left-hand menu to click on the "Settings" tab.
- Once in your account Settings, use the left-hand menu to click on the "Connections" tab.
- Navigate to the "Google Connection" section of the page to ensure that you Google Tag Manager is connected to your account. If you are having issues with your Google Connections, follow this guide.
- (See Figure 6)
- Navigate to the "Google Connection" section of the page to ensure that you Google Tag Manager is connected to your account. If you are having issues with your Google Connections, follow this guide.

Figure 6
Once these steps are completed then you are all connected to our tag monitoring solutions!Still have questions, concerns, or lack confidence in your updates? We've got you covered!
Reach out to our support team to have them review your updates.
Updated 7 months ago
Did this page help you?