How to Set Up Google Ads Remarketing and Conversion Tags via Google Tag Manager
Learn more about Google Ads Remarketing and how to configure the Conversion Tags.
Overview
Follow this guide to learn how to set up Google Ads Remarketing and Conversion tag in Google Tag Manager.
Prerequisites:
- Ensure that you have downloaded the Google Ads pre-built tags and imported them into your Google Tag Manager. Follow this guide to learn how.
Configure Google Ads Remarketing and Conversion Tags:
After you have imported our Google Tag Manager data layer containers for Shopify, you will have Google Ads tags that enable:
- Dynamic product remarketing
- Conversion tracking
Example Tags with Base Container: (See Figure 1)
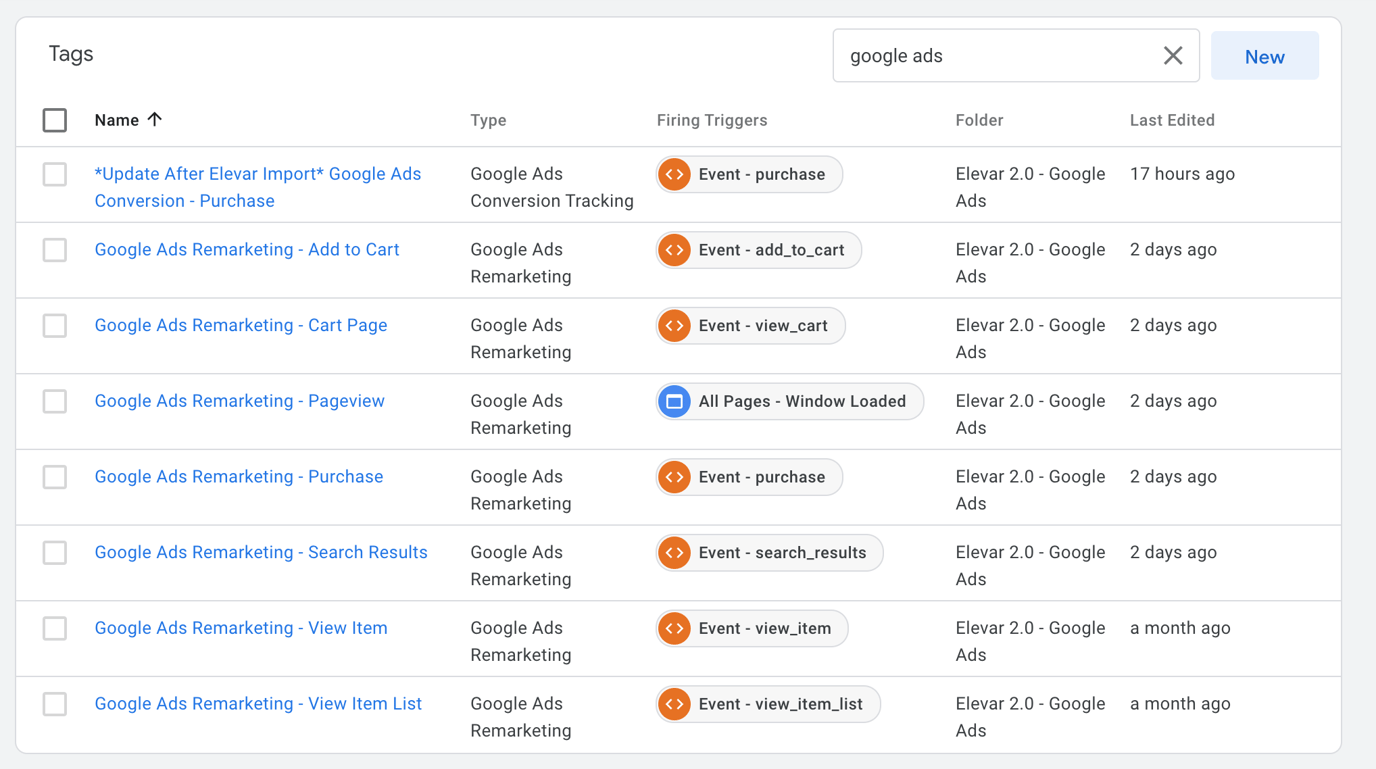 Figure 1
Enable Google Ads Remarketing Data Collection via Google Tag Manager
Access Audience Manager Settings:
- Begin on your Google Ads homepage and use the left-hand menu to click on the "Tools" tab.
- An additional pop-up menu will appear, navigate to the "Shared Library" section and use the drop-down menu to click on the "Audience Manager" tab.
- (See Figure 2)

Figure 2
Navigate to Google Ads Tag Details:
- Once in the Audience Manager settings, ensure that you are under the "Your Data Sources" tab.
- Locate the Google Ads Tag box and click on the "Details" button in the lower right-hand corner of the box.
- (See Figure 3)

Figure 3
Copy Conversion ID:
- Once in the Google Ads Tag details, navigate to the section of the page titled "Tag Setup".
- Click on the tab labeled "Use Google Tag Manager".
- Navigate to the section titled "Conversion ID" and copy that number.
- (See Figure 4)

Figure 4
Update Google Tag Manager Conversion ID:
- Begin on your Google Tag Manager homepage and use the left-hand menu to click on the "Variables" tab.
- Locate the section of the page titled "User-Defined Variables" and click on the variable titled "Update After Elevar Import_ - Google Ads - Conversion ID".
- Under the section titled "Value" paste the conversion ID value. Please ensure your constant is something like 123456789 (no dashes in-between the #'s and no AW in front)
- (See Figure 5)

Figure 5
Please make sure that you're using the correct variable to match the Product IDs in your Google Merchant Center: You can learn more about this in step 5 below.
We have SKU set in all tags by default when you import, but you can change this to product ID, variant ID, or other variations.
Implement Google Ads Purchase Conversion Tracking
Locate Conversion Label:
- In your Google Tag Manager account use the left-hand menu to click on the "Tags" tab.
- Once on the Tags page, use the search function located in the upper right-hand corner of the page and locate the "Google Ads Conversion Tracking" tag.
- Navigate to the "Tag Configuration" section of the page and use the text box to enter your Conversion Label. Note that this is different than the Conversion ID. Follow this guide to learn how to locate your Conversion Label.
- (See Figure 6)

Figure 6
Google Tag Manager Testing:
- Once you begin testing with Google Tag Manager in preview mode, you should see tags that fire on the front end of your site with data populating.
- (See Figure 7)
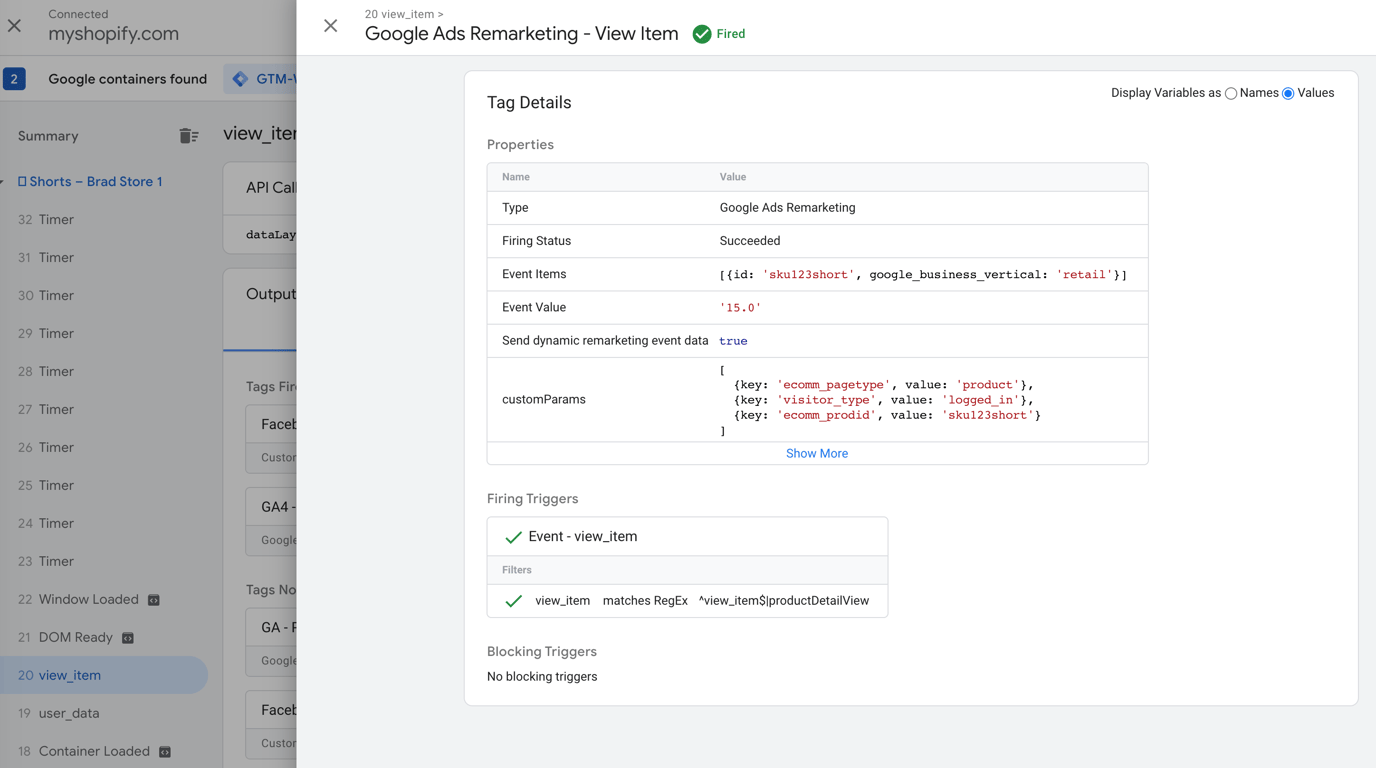 Figure 7
Remove Potential Duplicate Tracking and Publish
If you previously had Google Ads scripts/app or remarketing tags setup then you will need to remove these to prevent duplicate tags from firing.
We typically see Google Ads implemented in a few different ways:
- Hard-coded in the Shopify theme.
- Utilizing the native Google Shopping App, which doesn't support multi-currency among other issues).
- Older tags created in GTM accounts.
- It's best to check for yourself to be safe.
Validate Remarketing Data Is Collecting
There are two requirements to validate that remarketing tags exist and are sending data:
- Use the Google Tag Assistant across major pages to confirm data is sent (Home, collection, product, cart, checkout, purchase).
- View Google Ads tag source data inside of Google Ads account
Example of Using Elevar Google Tag Manager Suite: (See Figure 8)
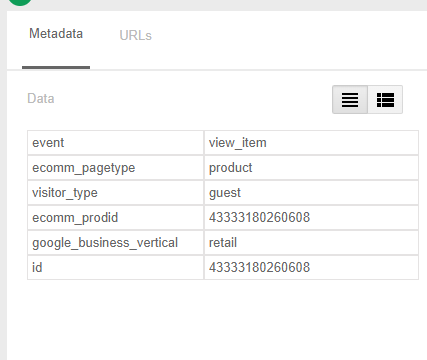 Figure 8
Example of Using Old, Non-Elevar GTM Parameters: (See Figure 9)
- You will not be able to validate if the ID or "ecomm_prodid" are the right values (i.e. SKU, product ID) from the GA tag assistant. This must be done inside Google Ads.
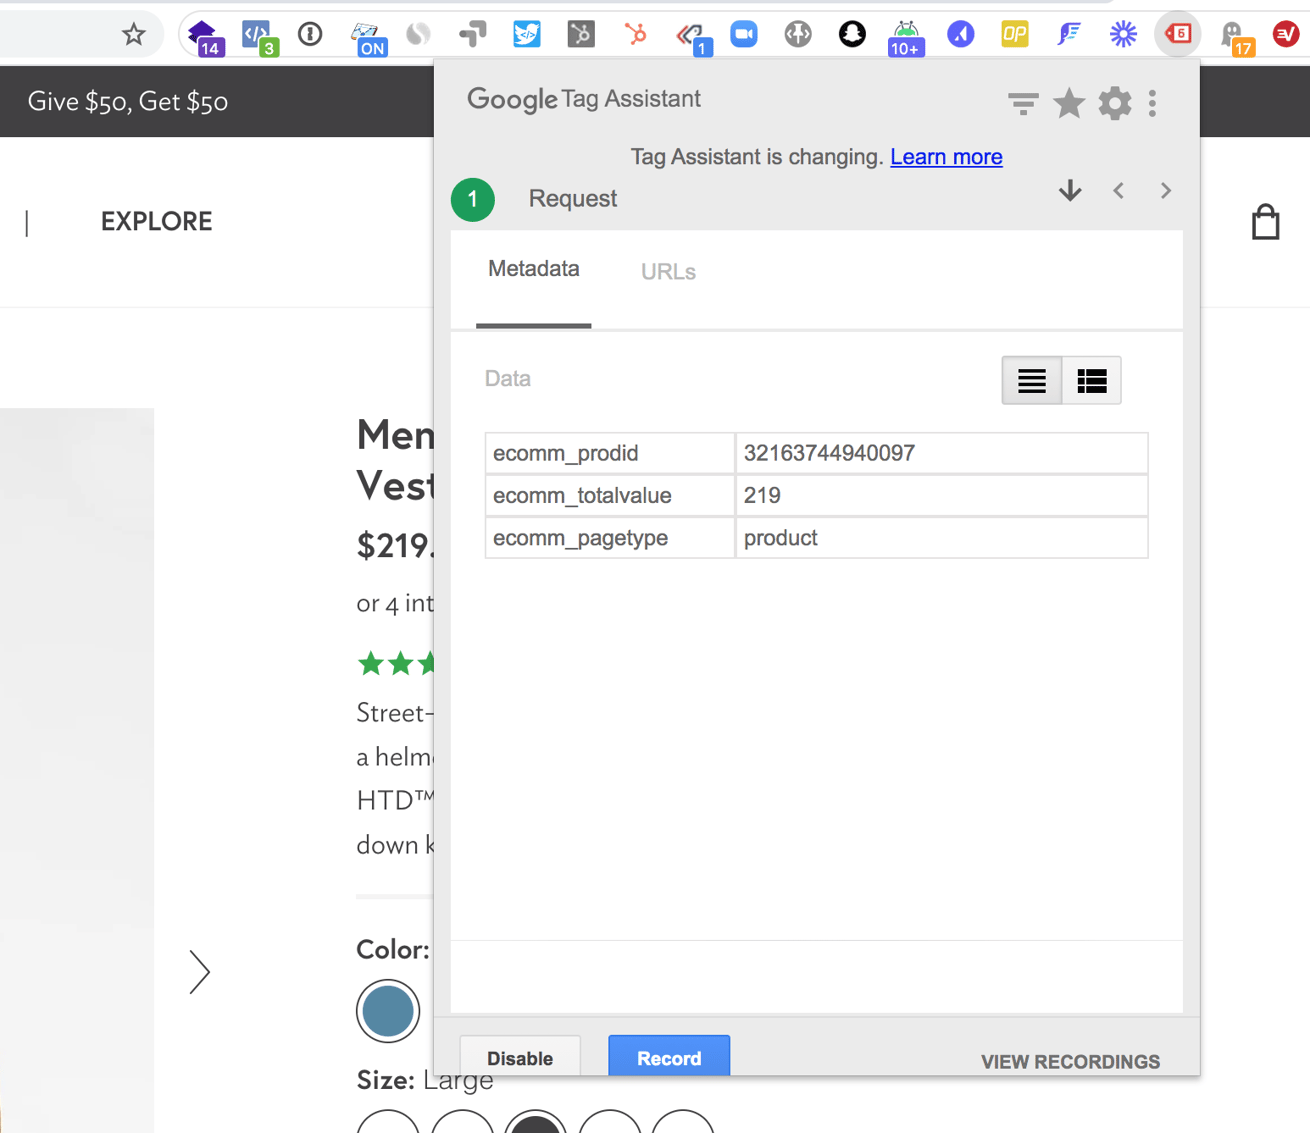 Figure 9
How to validate remarketing tag data inside of Google Ads:
- Go to your Google Ads account homepage and use the left-hand menu to click on the "Tools" tab.
- An additional pop-up menu will appear, navigate to the "Shared Library" section and use the drop-down menu to click on the "Audience Manager" tab.
- Here you should see Google Ads and Google Analytics data sources. If you don't see Google Ads (or it's 0) then the tag is not collecting data.
- (See Figure 10)
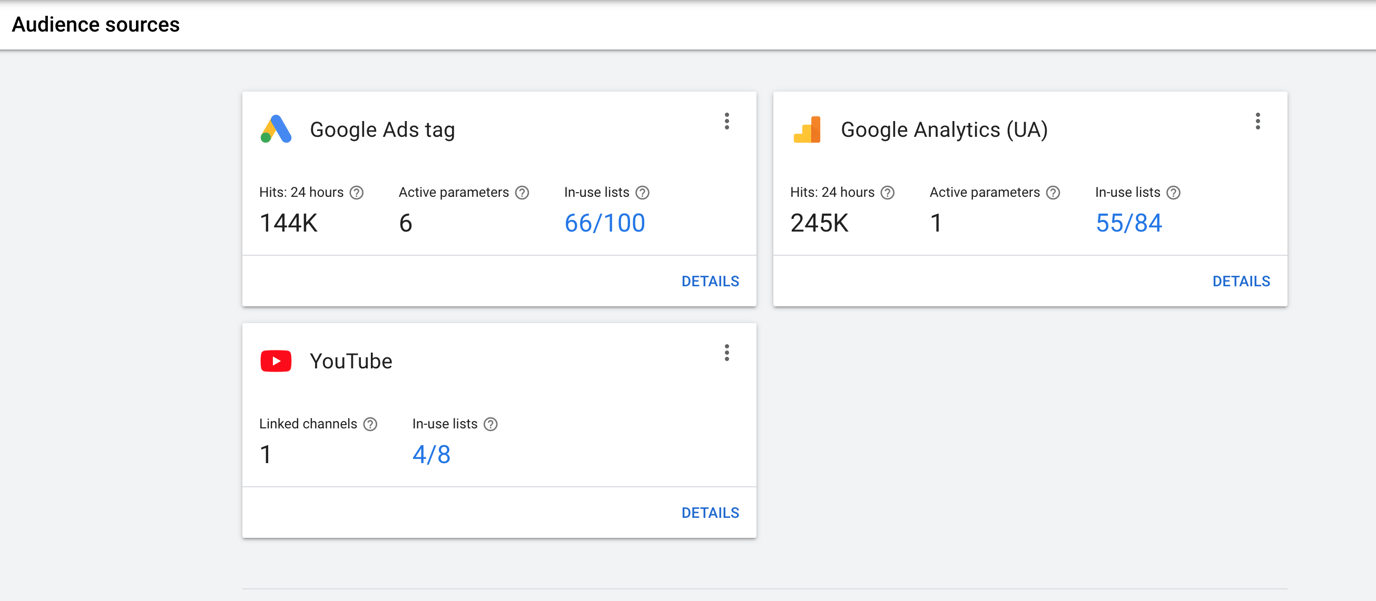 Figure 10
Validate Product Parameter Data
Errors:
- If your account has errors then you will see the details of these errors on the next screen after clicking details. The majority of the time it's due to product ID in tag doesn't match product ID in merchant center.
- (See Figure 11)
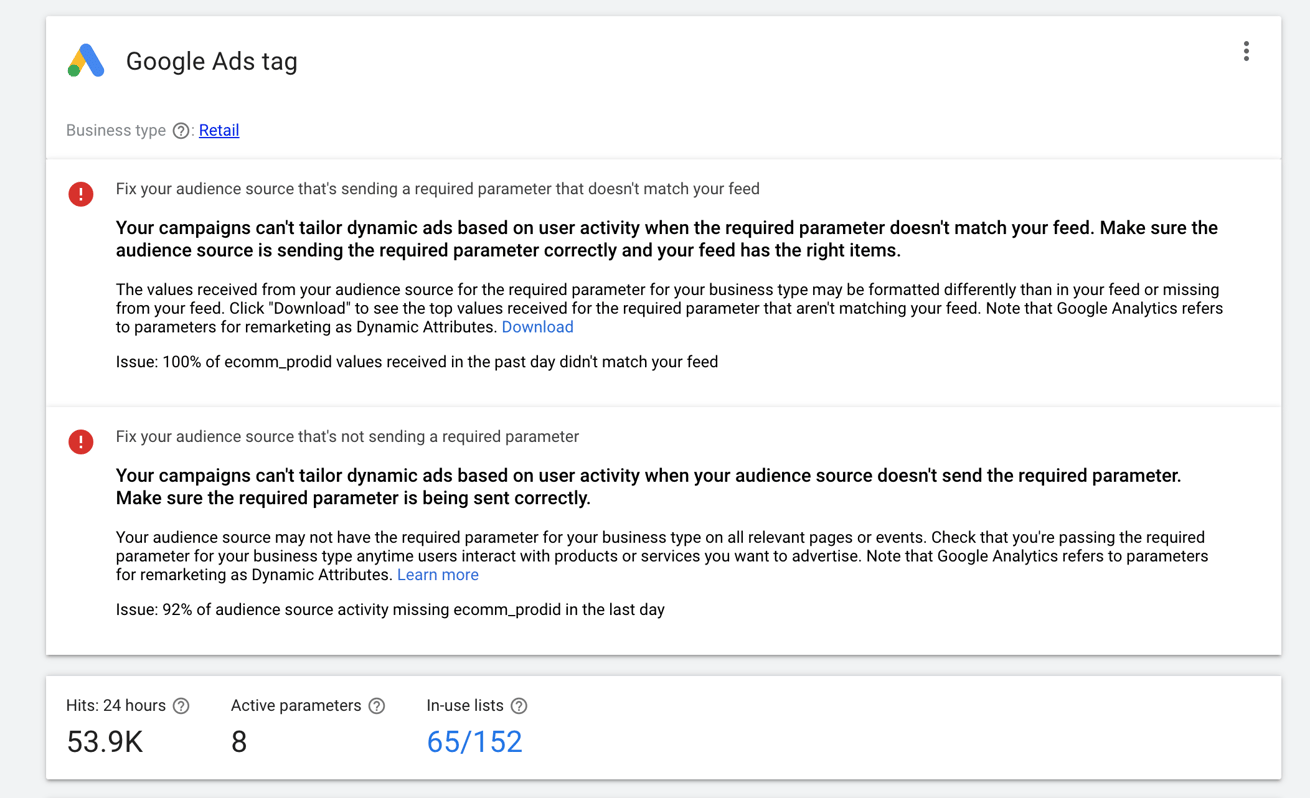 Figure 11
Mismatch Warning:
- If there are mismatch warnings like this then you need to update the tags to send the right product ID. It will be easier to change this compared tp changing the merchant center IDs.
- Inside Google Ads go to "Overview" settings by using the left-hand menu. An additional pop-up menu will appear, click on the "Product Groups" button. Then click on any product which will bring up a screen where you can view the product ID.
- If you are unsure if it's SKU, product ID, or variant ID then go to the product URL in browser and add .json to the URL. Then input the value from Google Ads and search for it in browser.
- (See Figure 12)

Figure 12
Note: Things to watch out for when matching IDs...
- Casing: Both can send SKU but tag has a different case than product.
- Internationalization for product feeds in different countries
Example of Good Elevar Parameter Data:
- At the minimum we should be sending:
- id or ecomm_prodid
- ecomm_pagetype or similar
- value or ecomm_totalvalue or similar
- You can click into the parameters to view more details on them and see what is being sent.
- These parameters are pre-configured in GTM Suite tags. If you are using another method - like hard coding in theme or Google Shopping App - then they might be slightly different.
- (See Figure 13)
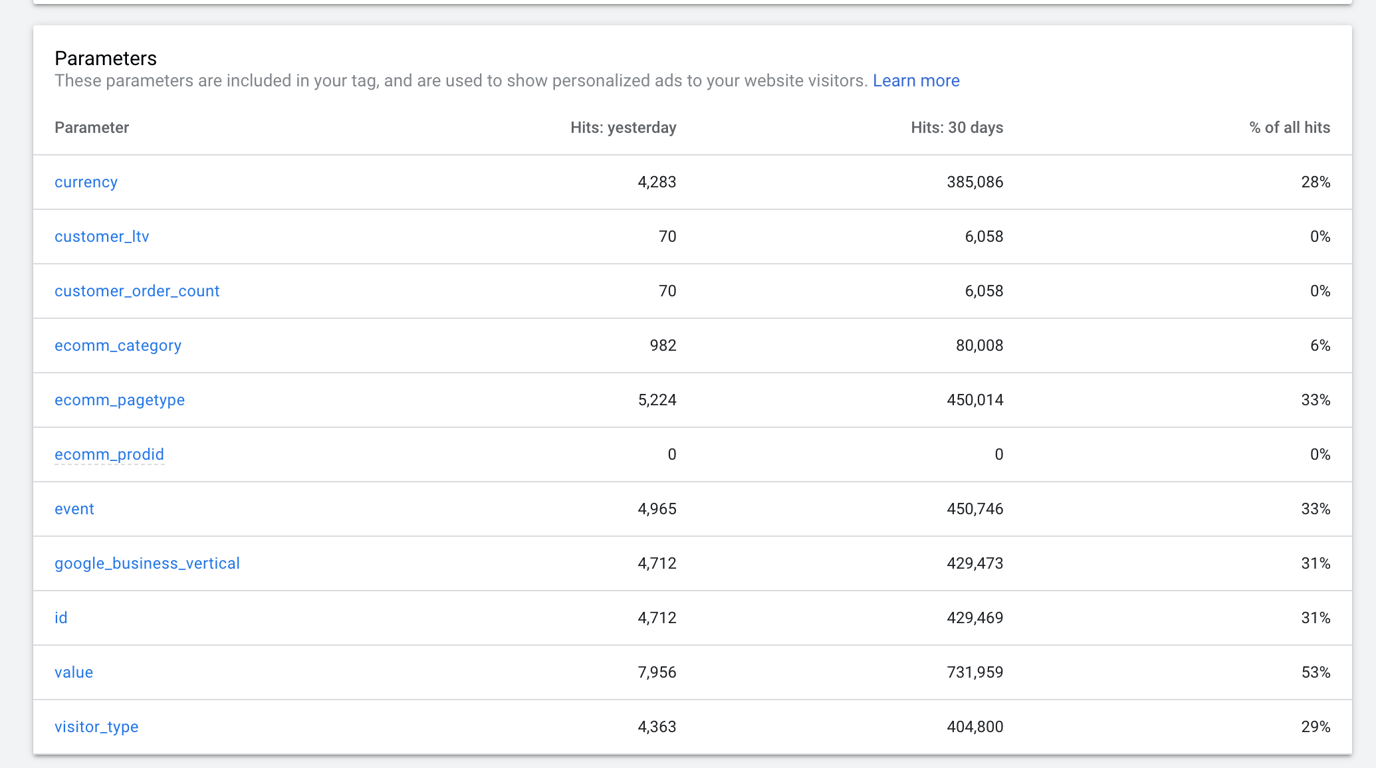 Figure 13
Validate Conversion Data
Marketing Tag Audit Requirements:
- At the minimum every Elevar customer that signs up for a marketing tag audit with us should have the following:
- Purchase conversions
- Non-purchase conversions for product view, add to cart, initiate checkout
The implementation can vary. Some might want to keep the conversion tag in Shopify thank you scripts, or GTM, or implemented another way. Our initial goal is to validate it's accurate.
- It will never match GA conversions. Read this article understand why if you are unsure.
- (See Figure 14)
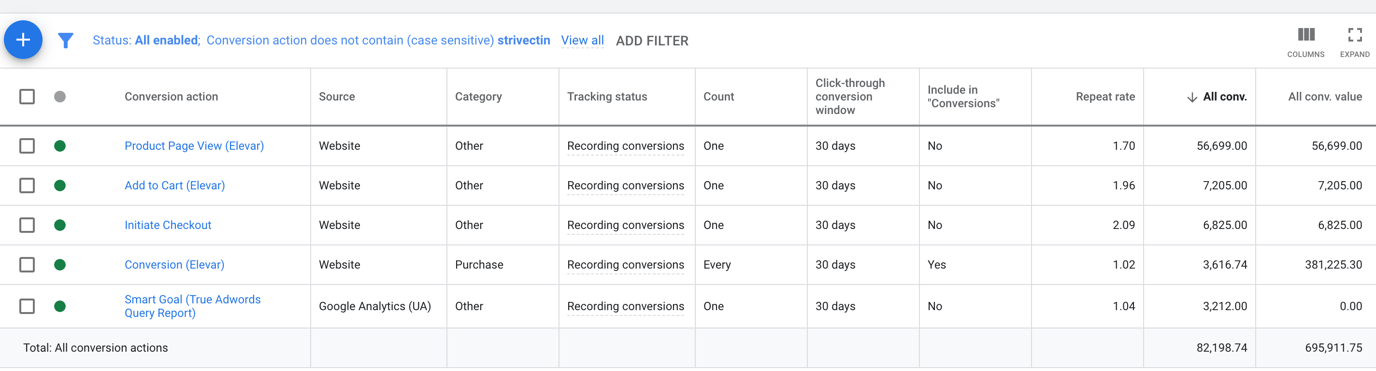 Figure 14
Note: Marketing Tag Audit
- Notice the "include in conversions" is only set to yes on the purchase (this is hardly ever set to yes on other conversions)
- Repeat rate is near 1 for purchases which means there are not duplicates. If there were then this would be closer to 2.
- To validate I typically pick a 7 day period in Google Ads (you can change date in top right) and then compare to Google Ads report in GA. These should be close.
- Some brands might have conversions mapped directly from Google Analytics revenue.
Example of Product View Conversion being sent as "yes" and causing a 911 spike in conversions: (See Figure15)
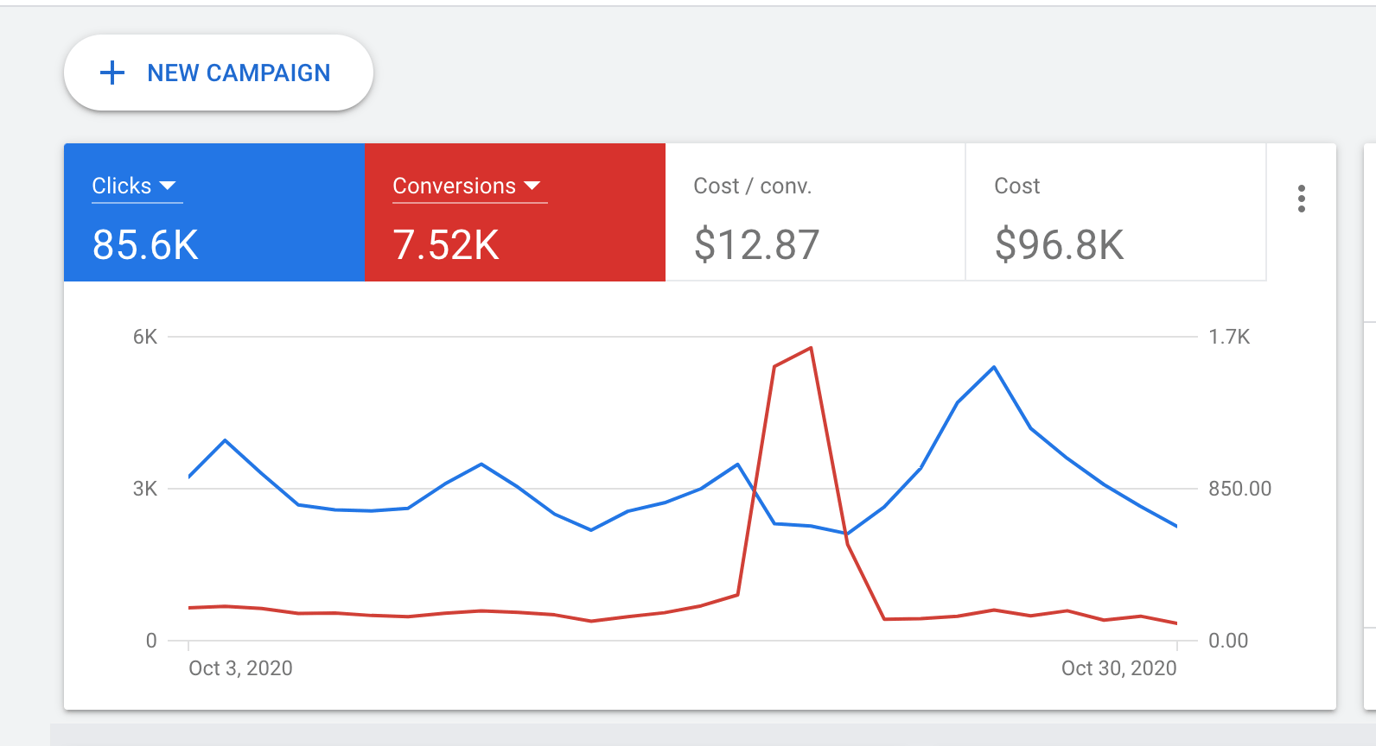 Figure 15
Note: Never change Google Ads settings on existing conversions without your marketing team being aware of this change.
Updated 6 months ago