

How to Set Up Google Ads as a Server-Side Destination
Follow the step-by-step guide to learn how to set up your Google Ads integration through Elevar's server-side destination
Overview
Follow this guide to learn how to set up Google Ads as a server side destination.
Prerequisites:
Before you can enable your Google Ads Server-Side Destination, you will need to:
- Install the Shopify Source on your store.
Learn About the Events and Properties Elevar Sends to Google AdsRead this guide to learn more about the specific events and properties Elevar sends to Google Ads!
Learn More: Google Ads Tracking Via Google Tag Manager and Import IntegrationFollow this guide to learn how to set up Google Ads via Google Tag Manager.
Follow this guide to learn how to set up GA4/Google Ads Import Integration.
Enable Enhanced Conversions in Google Ads
For optimal performance, enable the Enhanced Conversions setting and Accept Customer Data Terms within Google Ads prior to setting up this destination.
Enabling in Google Ads:
- Access the "Conversion Settings" in Google Ads, and ensure that you enable the feature to turn on Enhanced Conversions.
- For optimal performance, select "API" for the method. However, if this is an account-level setting in your Google Ads account, it will affect all of your conversion actions. If you have other conversion actions sending user data not via the API, choose the method that is best for your business.
- Elevar will be sending user data for enhanced conversions both browser side and via the API. If you select "Using Elevar" for Client-Side Tracking, the Google Tag will be used. If you select "Using Google Tag Manager", Google Tag Manager will be used.
- Once you have enabled the Enhanced Conversions, navigate to the section of the page titled "Customer Data Terms". Read the "Policies and Additional Terms for Customer Data" and then accept the terms.
- If you aren’t able to view terms, it's because your account conversions are tracked by a manager account. The customer data terms must be accepted from the manager's account and any Google Ads manager account uploading on behalf of the manager account using cross-account tracking.
Add Google Ads as a Server-Side Destination
Locate Google Ads Destination:
- Begin on the Elevar Dashboard and use the left-hand navigation menu to access the "My Tracking” page.
- Once, in "My Tracking" select the "Add Destination" button in the upper right hand corner of the page.
- A side bar pop-up window will appear, titled "Add Destination".
- Within this pop-up, use the search function and type "Google Ads".
- Once the Google Ads destination appears from the search function, click on it.
- (See Figure 1)

Figure 1
Get Started:
- After locating and clicking on the Google Ads destination, you will be taken to an overview screen.
- Click the "Get Started" button in the lower left-hand corner of the Overview box.
- (See Figure 2)

Figure 2
Give Elevar Access
- To enable your server-side destination you'll need to email the Elevar team ([email protected]) with your Account ID and a note that you'd like use to request access.
- You can expect a response from our team in 24 hours. Once Access has been requested by our team and granted by your team, you are ready to return to the Google Ads Destination and click the "Mark as Complete" button.
- (See Figure 3)

Figure 3
Entering Google Ads Settings
Google Ads Settings:
- Within the "Google Ads Settings" you will need to enter your Google Ads settings in order to connect your account.
- Here you need to input your Customer ID. These values are not the conversion label or conversion ID.
- If you have "Markets" enabled in your Shopify Source, you will see the "Markets" section in your Google Ads destination.
- Select either the "All Markets", "Specific market(s)", or the "No Market ID" button to specify which markets will send data to Google Ads.
- If you have selected "All Markets" navigate to the section titled "Destination Label" and use the text box to enter a label. This is how your destination name will appear across the Elevar app (e.g., My Tracking, Reports, History) and helps to identify your destination across our app, especially when you have multiple instances of the same destination.
- If you have selected "Specific market(s)", navigate to the section titled "Market Groups" and use the drop down menu to select the market groups to specify which market's data will be sent to this destination. Then, navigate to the box titled "Destination Label" and use the text box to enter a label. This is how your destination name will appear across the Elevar app (e.g., My Tracking, Reports, History) and helps to identify your destination across our app, especially when you have multiple instances of the same destination.
- Once you have entered all of the required information, click on the "Save and Continue" box at the bottom of this section.
- (See Figure 4)

Figure 4
Select Events:
-
Once you have entered your Google Ads Settings, you have to select the Event settings.
-
Either click on the button labeled "Use best practices" or "Customize settings".
-
After selecting what events you want to send, click on the "Save and Continue" button at the bottom of this section.
- (See Figure 5)

Figure 5
NOTE: Enabling Mid-Funnel Standard EventsIf you enable mid-funnel standard events within the destination settings, follow this guide to learn more about the new expanded standard events and how to configure them in your destinations and push the events to the data layer.
Configuring these events will allow the data to be passed both client-side and server-side, which allows for data enrichment of server sent events.
Note: Conversions will be created in Google AdsWe will auto-create the the conversion actions for selected event(s) and complete the Conversion Action CTID for you. All conversion actions are set as secondary. Observe and analyze the conversion action data, and if the Elevar tracking is better change Elevar’s conversion action to primary. The conversion actions created for you will be labeled "(elevar enhanced)".
If you wish to send conversion data to existing conversion actions just enter the Conversion Action CTID [ How do I find that? ] in the field for each event and new conversion actions will not be created. We will map the data to your existing action.
Read this guide to learn more about Conversion Actions and Ad Optimization in Google Ads.
Consent:
- After selecting the Events settings, you will be prompted to select your Consent settings.
- To enable Consent, click on the "Yes, enable for this destination" button. If you do not want to enable Consent, click on the "No" button.
- If consent is required, select what categories you’d like the shopper to agree to before tracking fires. [Learn More]
- Once you have all of selected all of the information for enabling Consent, click on the "Save and Continue" button at the bottom of this section.
- (See Figure 6)

Figure 6
Enabling Consent Mode:By enabling consent mode, your marketing data processing will depend on:
- Your consent platform configuration
- How your visitors interact with the cookie banner
- What geolocation they visit the store from
That's why you may see a decrease in data across your marketing platforms and lower marketing campaign performance.
For EU Stores: If you are making your tracking setup consent compliant for the first time, you may see a 10-80% decrease in data across all of your marketing destinations.
Filter Transactions:
- Next, you need to choose whether or not to filter transactions.
- Currently, our recommended practices suggests clicking the button labeled, "Yes, allow specific transactions", and allowing your Web orders.
- Not sure if you need to block orders? Look at what Sales Channels you have in Shopify!
- Once you have selected all of the information for Filter Transactions, click on the "Save and Continue" button at the bottom of this section.
- (See Figure 7)

Figure 7
Client-Side Tracking Setup:
- After selecting details for filtering transactions, you need to set up client-side tracking.
- Click on either the "Using Elevar" button or click on the "Using Google Tag Manager" button and set up the web container.
- After setting up the web container, click on the "Mark as Complete" button at the bottom of this section.
- (See Figure 8)

Figure 8
Go Live:
- After completing all of the previous Google Ads Setup Steps, an Overview page will appear.
- If all of the details within the Configuration Summary look correct, then click on the button labeled "Go Live" at the bottom of this section.
- A pop-up window will appear, asking for a confirmation of your changes.
- Click on the button labeled "Yes, Go Live".
- (See Figure 9)
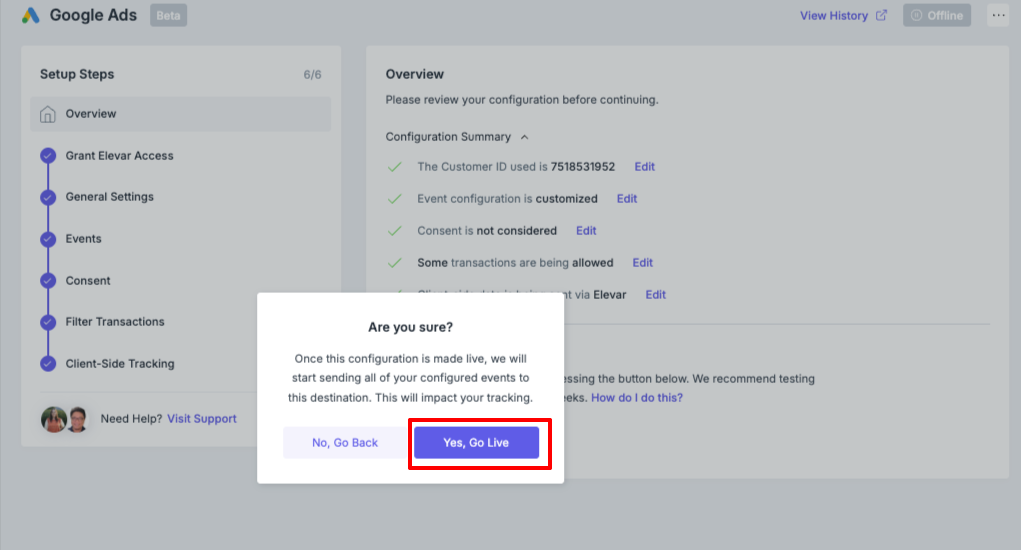
Figure 9
What's Next?Compare Your Before and After Performance: Run your tracking via Elevar's integration for at least 7 days and compare your data. Follow this guide to learn how to analyze before and after results for Google Ads.
Updated 11 days ago