How to Configure Multiple Meta (Facebook) Pixels
Overview:
If you are using Elevar, you can have up to five Meta (Facebook) Pixels on your store, as long as they are properly configured in Google Tag Manager to prevent conflicts and ensure accurate tracking. Follow this guide to learn how to configure multiple Meta (Facebook) pixels within Google Tag Manager!
Learn More: Meta (Facebook) Pixel
Read this guide to learn more about the Meta (Facebook) pixel.
Repeat Each Step Per Pixel:
You are able to have multiple Meta (Facebook) Pixels on your Shopify Store, up to five different pixels, however you will need ensure that the additional pixels are set up in Google Tag Manager.
For each Meta (Facebook) pixel, ensure that you repeat the follow process per pixel!
Download Web Container
Importing Web Container During Implementation:
If you have already imported the web container during the implementation process of the Meta (Facebook) destination in Elevar, you may not need to repeat these steps unless you are adding additional pixels or reconfiguring existing ones.
However, if you're starting fresh or need to re-import, follow these steps to download and import the web container for each additional Meta (Facebook) Pixel into Google Tag Manager.
Access Destination:
- Begin on your Elevar homepage and use the left-hand navigation menu to locate and click on the "My Tracking" tab.
- Navigate to your list of destinations and click on the Meta (Facebook) destination with the specific pixel that you would like to import into Google Tag Manager.
Download Pre-Built Web Tags:
- Once in the desired destination, navigate to the "Setup Steps" box and click on the "Web Container Setup" tab.
- Locate and click on the "Download Pre-Built Web Tags" button to download the file. This will download a zip folder that contains a JSON folder for the destination.
- (See Figure 1)

_Figure 1_
Import the Pre-Built Meta (Facebook) Tags into GTM
Import Container:
- Log in to your Google Tag Manager Account.
- Select your GTM Web Container.
- Click on the "Admin" button located in the upper menu bar.
- Use the right-hand menu under the "Container" section and click on the tab labeled "Import Container".
- (See Figure 2)
- Use the right-hand menu under the "Container" section and click on the tab labeled "Import Container".

Figure 2
Import Container Information:
- Under the "Select file to import" section, click on the "Select File" button and choose the Meta (Facebook) Container that was previously downloaded with the specific pixel that you would like to import.
- Under the "Choose workplace" section, either create a new workplace or select your "Default Tracking".
- Next be sure to select the "Merge" option first, then the "Overwrite conflicting tags, triggers, and variables" option second.
- Once you have completed filling out the necessary details for this container, click on the "Confirm" button located at the bottom of the page.
- (See Figure 3)

Figure 3
[Optional] QA the New Tags with Google Tag Manager's Preview Mode
- Follow our guide to QA your tags in Google Tag Manager (GTM) preview mode.
Publish the Pre-Built Tags
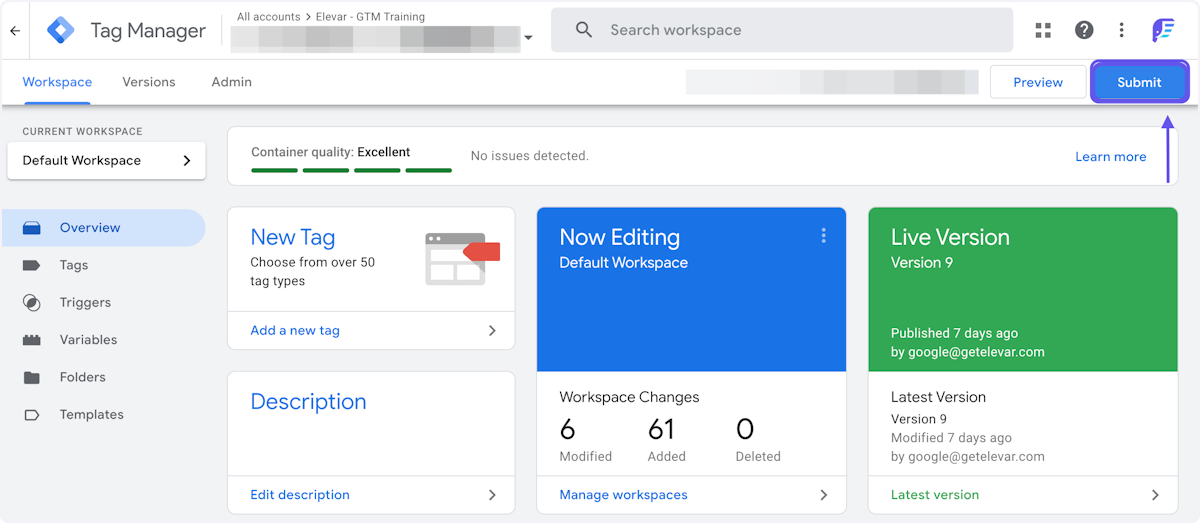
- After importing the Meta (Facebook) tag container with your additional pixel, you will be brought back to the Google Tag Manager homepage.
- In your Google Tag Manager workspace, click on the "Submit" button in the upper right hand corner of the page.
- An additional confirmation page will appear. Be sure to click on the "Publish" button in the upper right-hand corner of the page.
- (See Figure 4)
- An additional confirmation page will appear. Be sure to click on the "Publish" button in the upper right-hand corner of the page.

Figure 4
(Optional) Validate Events
Meta (Facebook) Pixel Helper:
- Once you have made the necessary changes in Google Tag Manager, you can now validate that the events are only sent once per pixel in Meta (Facebook) pixel helper.
- (See Figure 5)

_Figure 5_
Updated about 1 month ago
