How to Set Up Yotpo as a Server-Side Destination
Important Notice: Yotpo Email/SMS DeprecationYotpo has announced that their Email and SMS products will be shutting down at the end of 2025.
If you are still relying on Yotpo Email/SMS, we recommend beginning your migration as soon as possible to avoid disruptions in your marketing and customer communication. The following documentation remains available for reference but will no longer apply once Yotpo Email/SMS is fully sunset.
Overview
Follow this guide to learn how to set up Yotpo as a server side destination.
Prerequisites:
- If you haven't installed our Shopify Source in your Elevar App. Follow this guide to learn how to implement the Shopify Source.
- Follow this guide this guide to learn how to set up and create an SMS action flow in Yotpo.
- Follow this guide to learn how to set up and create an email action flow in Yotpo.
- Ensure you have the Yotpo SMS and Email module purchased before connecting with Elevar, as Yotpo offers different products with varying requirements.
Yotpo and Elevar Integration: SMS and Email OnlyThis integration is exclusive to Yotpo’s SMS and Email products. To avoid errors, ensure you have the Yotpo SMS and Email module purchased before connecting with Elevar, as Yotpo offers different products with varying requirements.
Integration Benefits:
- More Events Sent: The integration boosts the number of events sent to Yotpo SMS & Email, unlocking more automated flows.
- Increased Engagement: Personalized messages drive higher engagement and more conversions.
Make sure your Yotpo account is set up with the correct modules to fully leverage this integration.Read this Yotpo article to learn more about the Yotpo and Elevar Integration.
Important: Only subscribed customers will be eligible to trigger an abandoned flow.
Learn About the Events and Properties Elevar Sends to YotpoRead this guide to learn more about the specific events and properties Elevar sends to Yotpo.
Read More: To learn more about these reminders, read this article about abandoned checkout reminders and regulations for US shoppers.
Add Yotpo as a Server-Side Destination
Prefer to watch a video?Follow this video to learn how to set up Yotpo as a server-side destination!
Locate Yotpo Destination:
- Begin on the Elevar Dashboard and use the left-hand navigation menu to access the "My Tracking” page.
- Once in "My Tracking", select the "Add Destination" button in the upper right hand corner of the page.
- A side bar pop-up window will appear, titled "Add Destination".
- Within this pop-up, use the search function and type "Yotpo".
- Once the Yotpo destination appears from the search function, click on it.
- (See Figure 1)
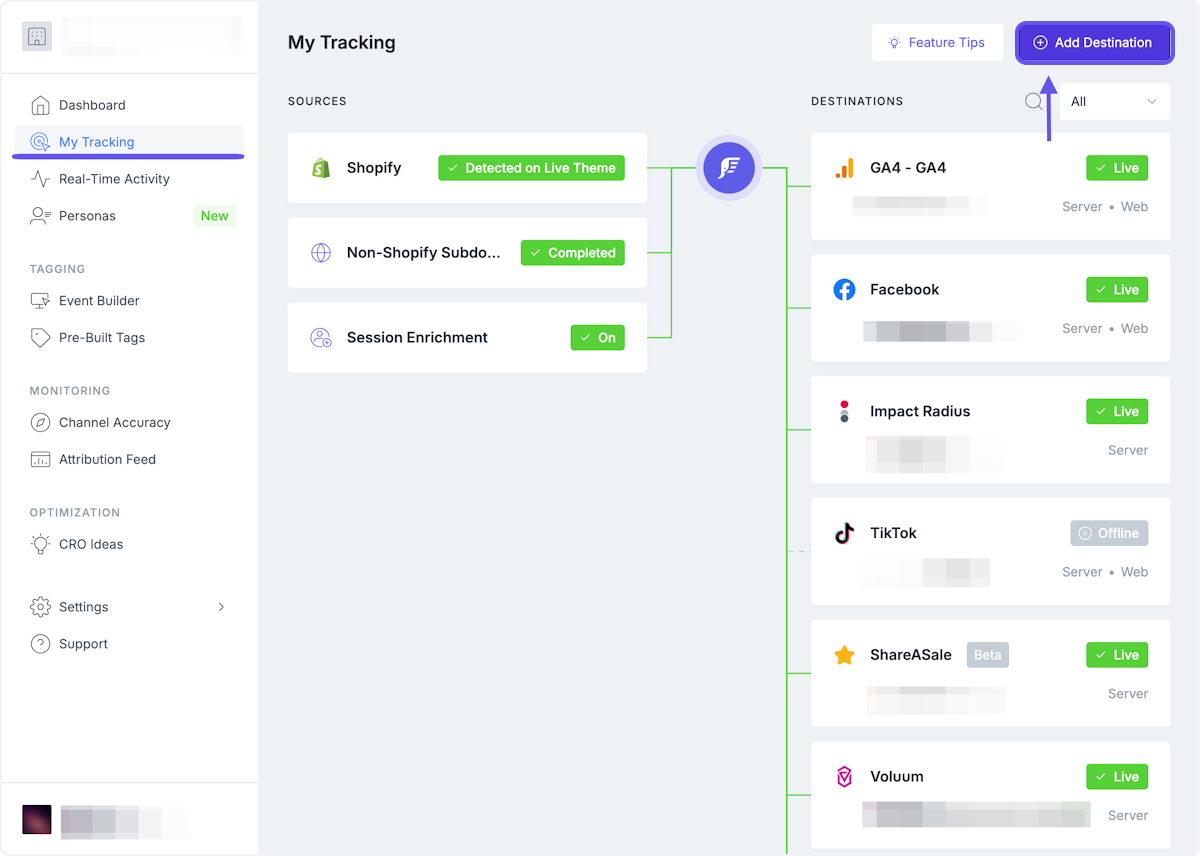
Figure 1
Get Started:
- After locating and clicking on the Yotpo destination, you will be taken to overview screen.
- Click the "Get Started" button in the lower left-hand corner of the Overview box.
Enter Yotpo Settings
Yotpo Settings:
- Within the "Yotpo Settings", locate and click on "Connect Yotpo Account" button.
- If you have "Markets" enabled in your Shopify Source, you will see the "Markets" section in your Yotpo destination.
- Select either the "All Markets", "Specific market(s)", or the "No Market ID" button to specify which markets will send data to Yotpo
- If you have selected "All Markets" navigate to the section titled "Destination Label" and use the text box to enter a label. This is how your destination name will appear across the Elevar app (e.g., My Tracking, Reports, History) and helps to identify your destination across our app, especially when you have multiple instances of the same destination.
- If you have selected "Specific market(s)", navigate to the section titled "Market Groups" and use the drop down menu to select the market groups to specify which market's data will be sent to this destination. Then, navigate to the box titled "Destination Label" and use the text box to enter a label. This is how your destination name will appear across the Elevar app (e.g., My Tracking, Reports, History) and helps to identify your destination across our app, especially when you have multiple instances of the same destination.
- Click on the "Save and Continue" button at the bottom of this section.
- (See Figure 2)

Figure 2
Select Events:
- Once you have connected your Yotpo account, you have to select the Event settings.
- Either click on the button labeled "Use best practices" or "Customize settings".
- After selecting what events you want to send, click on the "Save and Continue" button located at the bottom of this section.
- (See Figure 3)

Figure 3
Consent Mode:
- After selecting the Events settings, you will be prompted to enable Consent Mode.
- To enable Consent Mode, click on the "Yes, enable for this destination" button. By enabling Consent Mode, this destination will be made "consent aware". This allows you to adjust when data gets sent to this destination based on the consent choices of your users. Then navigate to the section of the page titled "What consent categories should a shopper accept before tracking fires?" and use the checkbox to enable the desires consent categories.
- If consent is required, select what categories you’d like the shopper to agree to before tracking fires. [Learn More]
- If you do not want to enable Consent Mode, click on the "No" button.
- Once you have all of selected all of the information for enabling Consent Mode, click on the "Save and Continue" button located at the bottom of this section.
- (See Figure 4)

Figure 4
Select Product Identifier:
- After selecting details for Consent Mode, you need to choose a Product Identifier.
- Click on either the "Product ID" or the "Variant ID" button. Typically, "Product ID" is the recommended Product Identifier for Yotpo.
- After selecting the Product Identifier, click on the "Save and Continue" button located at the bottom of this section
- (See Figure 5)

Figure 5
Filter Transactions:
- After selecting details for the Product Identifier, you need to choose whether or not to filter transactions.
- Currently, our recommended practices suggests clicking the button labeled, "Yes, block", and blocking exchange & historical import orders.
- Thinking you may need to block additional orders? Learn how to block these orders in this guide.
- Not sure if you need to block orders? Look at what Sales Channels you have in Shopify!
- Once you have all of selected all of the information for Filtered Transactions, click on the "Save and Continue" button located at the bottom of this section.
- (See Figure 6)

Figure 6
Go Live:
- After completing all of the previous Yotpo Setup Steps, an Overview page will appear.
- If all of the details within the Configuration Summary look correct, then click on the button labeled "Go Live" at the bottom of this section.
- A pop-up window will appear, asking for a confirmation of your changes.
- Click on the "Yes, Go Live" button located in the lower right-hand corner of the confirmation window.
- (See Figure 7)

_Figure 7_
What's Next?After configuring your Yotpo destination, set up your split test to send messages to only the net new abandoners identified by Elevar so that you can see the net new revenue generated.
Follow this guide to learn how to set up Yotpo split tests!
Updated 11 days ago